TLDR (AHOY);
Step-1: install backstop command in ahoy, by pasting the following in .ahoy.yml file
| |
Step-2: generate the backstop config file, by running the following command, and configure it:
| |
* You can use this configuration file as starting point: example-backstop.json
(note that here we’re omitting all the scenario values, thus they will default to: default-scenario.txt)
Step-3: generate reference bitmap and run test, by running the following command:
| |
Step-4: check test result, by running the following command:
| |
What is BackstopJS ?
BackstopJS is an open-source JavaScript framework designed to automate visual regression testing. It helps identify unintended visual changes to a website or application’s layout, colors, fonts, or other visual elements that might occur after code modifications.
A follow up question might be, why we need visual regression testing ?
Visual regression testing is needed to catch visual bugs and inconsistencies in user interfaces (UI) that traditional functional tests miss. By comparing “before” and “after” images, it ensures that code changes don’t introduce unwanted visual discrepancies like misaligned elements, incorrect colors, or broken layouts. This prevents negative impacts on user experience and brand reputation, saves develop…
BackstopJS in DDEV
You can add the backstop add-on via running the following command in the root of a ddev project:
| |
After that you should be able to run any of the following:
ddev backstop initcreate simple backstop.json config fileddev backstop testtest the url against referenceddev backstop referencefetch referenceUrl bitmap as referenceddev backstop approveuse the latest test bitmap as referenceddev backstop-reportsopen the report index.html file
BackstopJS in Lagoon / Ahoy
You can add custom ahoy command, in the file custom/ahoy.yml :
| |
(*⚠️ IMPORTANT: remember to change the
myprojectin the above command to your project name!!!)
After that you should be able to run any of the following:
ahoy backstop initcreate simple backstop.json config fileahoy backstop testtest the url against referenceahoy backstop referencefetch referenceUrl bitmap as referenceahoy backstop approveuse the latest test bitmap as referenceahoy backstop-resultsopen the report index.html file
(*Explanation for the custom backstop related commands:
Below are the explanation for the docker command that will be used later on in the
ahoy.ymlfile:
1 2 3 4 5 6 7 8 9docker run \ --name myproject-backdropjs --rm \ --user $(id -u) \ --shm-size 2048m \ --add-host=myproject.docker.amazee.io:host-gateway \ --add-host="www.google-analytics.com:127.0.0.1" \ --add-host="google-analytics.com:127.0.0.1" \ -v "$(pwd)":/src backstopjs/backstopjs:6.3.25Quick Breakdown of the Command:
--rm: automatically remove the container once it stops running--user $(id -i): runs the container as your current user ID instead of the default root inside your container--shm-size 2048m: set the shared memory size for the container to be 2048MB (2GB)--add-host=...:
- purpose1: to allow the backdrop docker container to use the amaze network to reach the website sitting in the docker container on your local computer
- purpose2: blocks Google Analytics requests, preventing network calls or tracking when running test
-v "$(pwd)":/src: mount the current directory (i.e. $pwd) into the container at “/src” (this allows backstop JS to access your test configuration backstop.json, and save output such as screenshot, reports, etc to your local server)backstopjs/backstopjs: official backstopJS docker image
Usage of BackdropJS
Note: the following guide focuses on how to use it in “lagoon/ahoy” environment, but by skimming through the following guide you should be able to achieve similar outcome in a “ddev” environment very easily)
Scenario 1: Compare Two Different Websites
Step1: Initialise Config File
Initialise the backstop.json file via running (ahoy / ddev) backstop init, you’ll find a new file located at (./test/backstop/) backstop.json in your project root. (If you want to start over, you can delete the whole backstop directory and re-run the (ahoy / ddev) backstop init command.
Step2: Modify Config File
Modify the backstop.json to configure with attention to the following:
url: The URL of your app state (i.e. the test target, usually in patternhttp://myproject.docker.amazee.io/)referenceUrl: Specify a different state or environment when creating reference. (Used to generaete the initial set of reference baseline screenshot, this can be either the production site OR a staging environment)viewports: the different view ports to test the website withselectors: Array of selectors to capture. Defaults to document if omitted. Use “viewport” to capture the viewport size. See Targeting elements in the next section for more info…
Below is an example backstop.json file:
| |
**Step3: Generate Reference Bitmap **
Run command (ahoy / ddev) backdrop reference to genereate a new set of bitmaps in (./test/backdrop/) bitmaps_reference/<time_stamp>, running test in the next step will compare the test bitmap with this bit map generated (or the latest one generated).
Whenever you want to get a new reference bitmap from the reference subject url (e.g. when the production website made a change on somthing), you should re-run this command (ahoy / ddev) backdrop reference.
Step4: Compare Test Subject with Reference
Run command (ahoy / ddev) backdrop test to generate a new set of (test) bitmap in (./test/backdrop/) bitmaps_test/<time_stamp> and compare it with the latest reference bitmao in the (./test/backdrop/) bitmaps_reference/ directory.
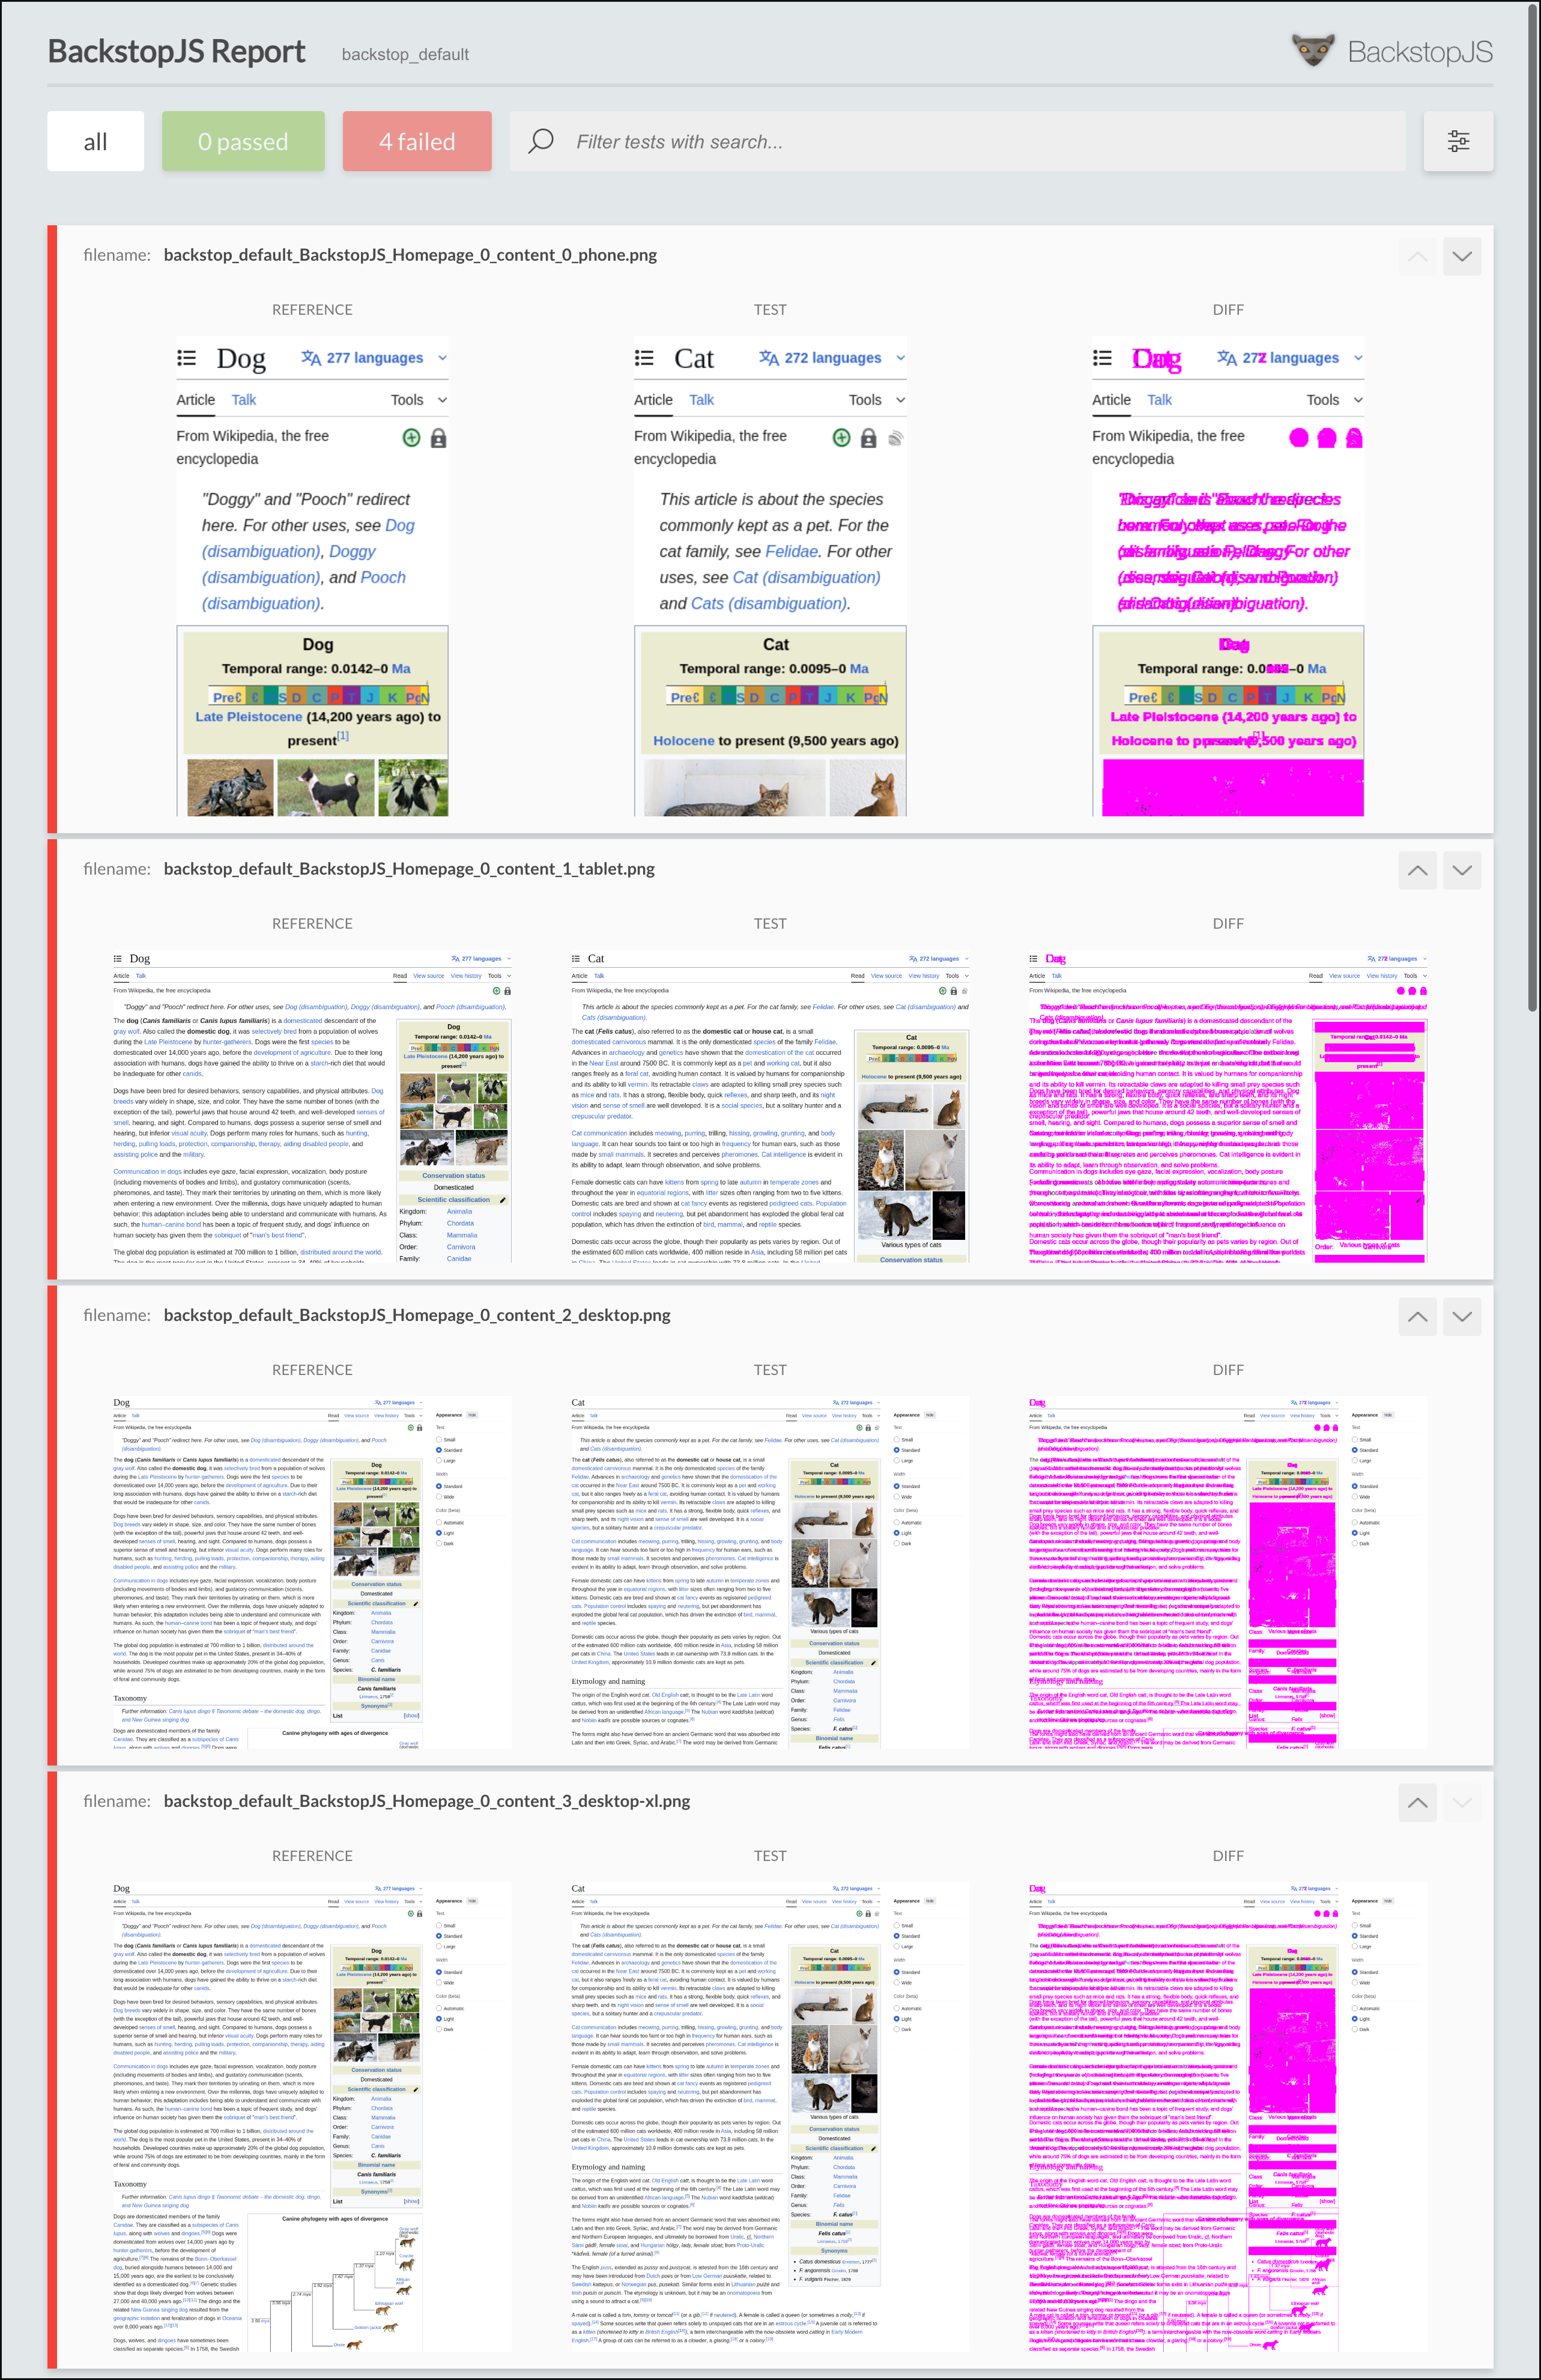
A report will be generated at (./tests/backstop/) backstop_data/html_report/index.html, and you can view it via your default browser via running ahoy backstop-results (OR ddev backstop-resultsOR open it directly).
Scenario 2: Track Changes within a Single Website
Step1: Initializate config file
(identical to scenario-1, but remember, you need to backup the backstop.json and delete the whole ./test/backstop folder to start over, if you want to switch between the scenario-1 and scenario-2)
Step2: Modify config file
Similar to screnario-1, but this time you need to delete the line containing referenceUrl.
Below is an example backstop.json file:
| |
Step3: Generate Reference
Unlike scenario-1 where you have a reference url to fetch bitmap from, here since we’re tracking the changes, we are actually using a version/state/revision of the website as the reference.
To do that, first run (ahoy / ddev) backstop test to genereate a bitmap of the current version of the website in (./test/backdrop/)bitmaps_test/<timestamp>/, then run (ahoy / ddev) backstop approve to promote this test bitmap to become a part of the reference collection by moving it into (./test/backdrop/)backstop_data/bitmap_reference/ directory.
(⚠️IMPORTANT: if you only run
testwithout runningapprove, you might see something like this in your report: image-20251110115540991, with errorBACKSTOP ERROR: Reference file not found /src/bitmaps_reference/backstop_default_BackstopJS_<element-name>_<viewport-name>.png)
Step4: Compare Difference
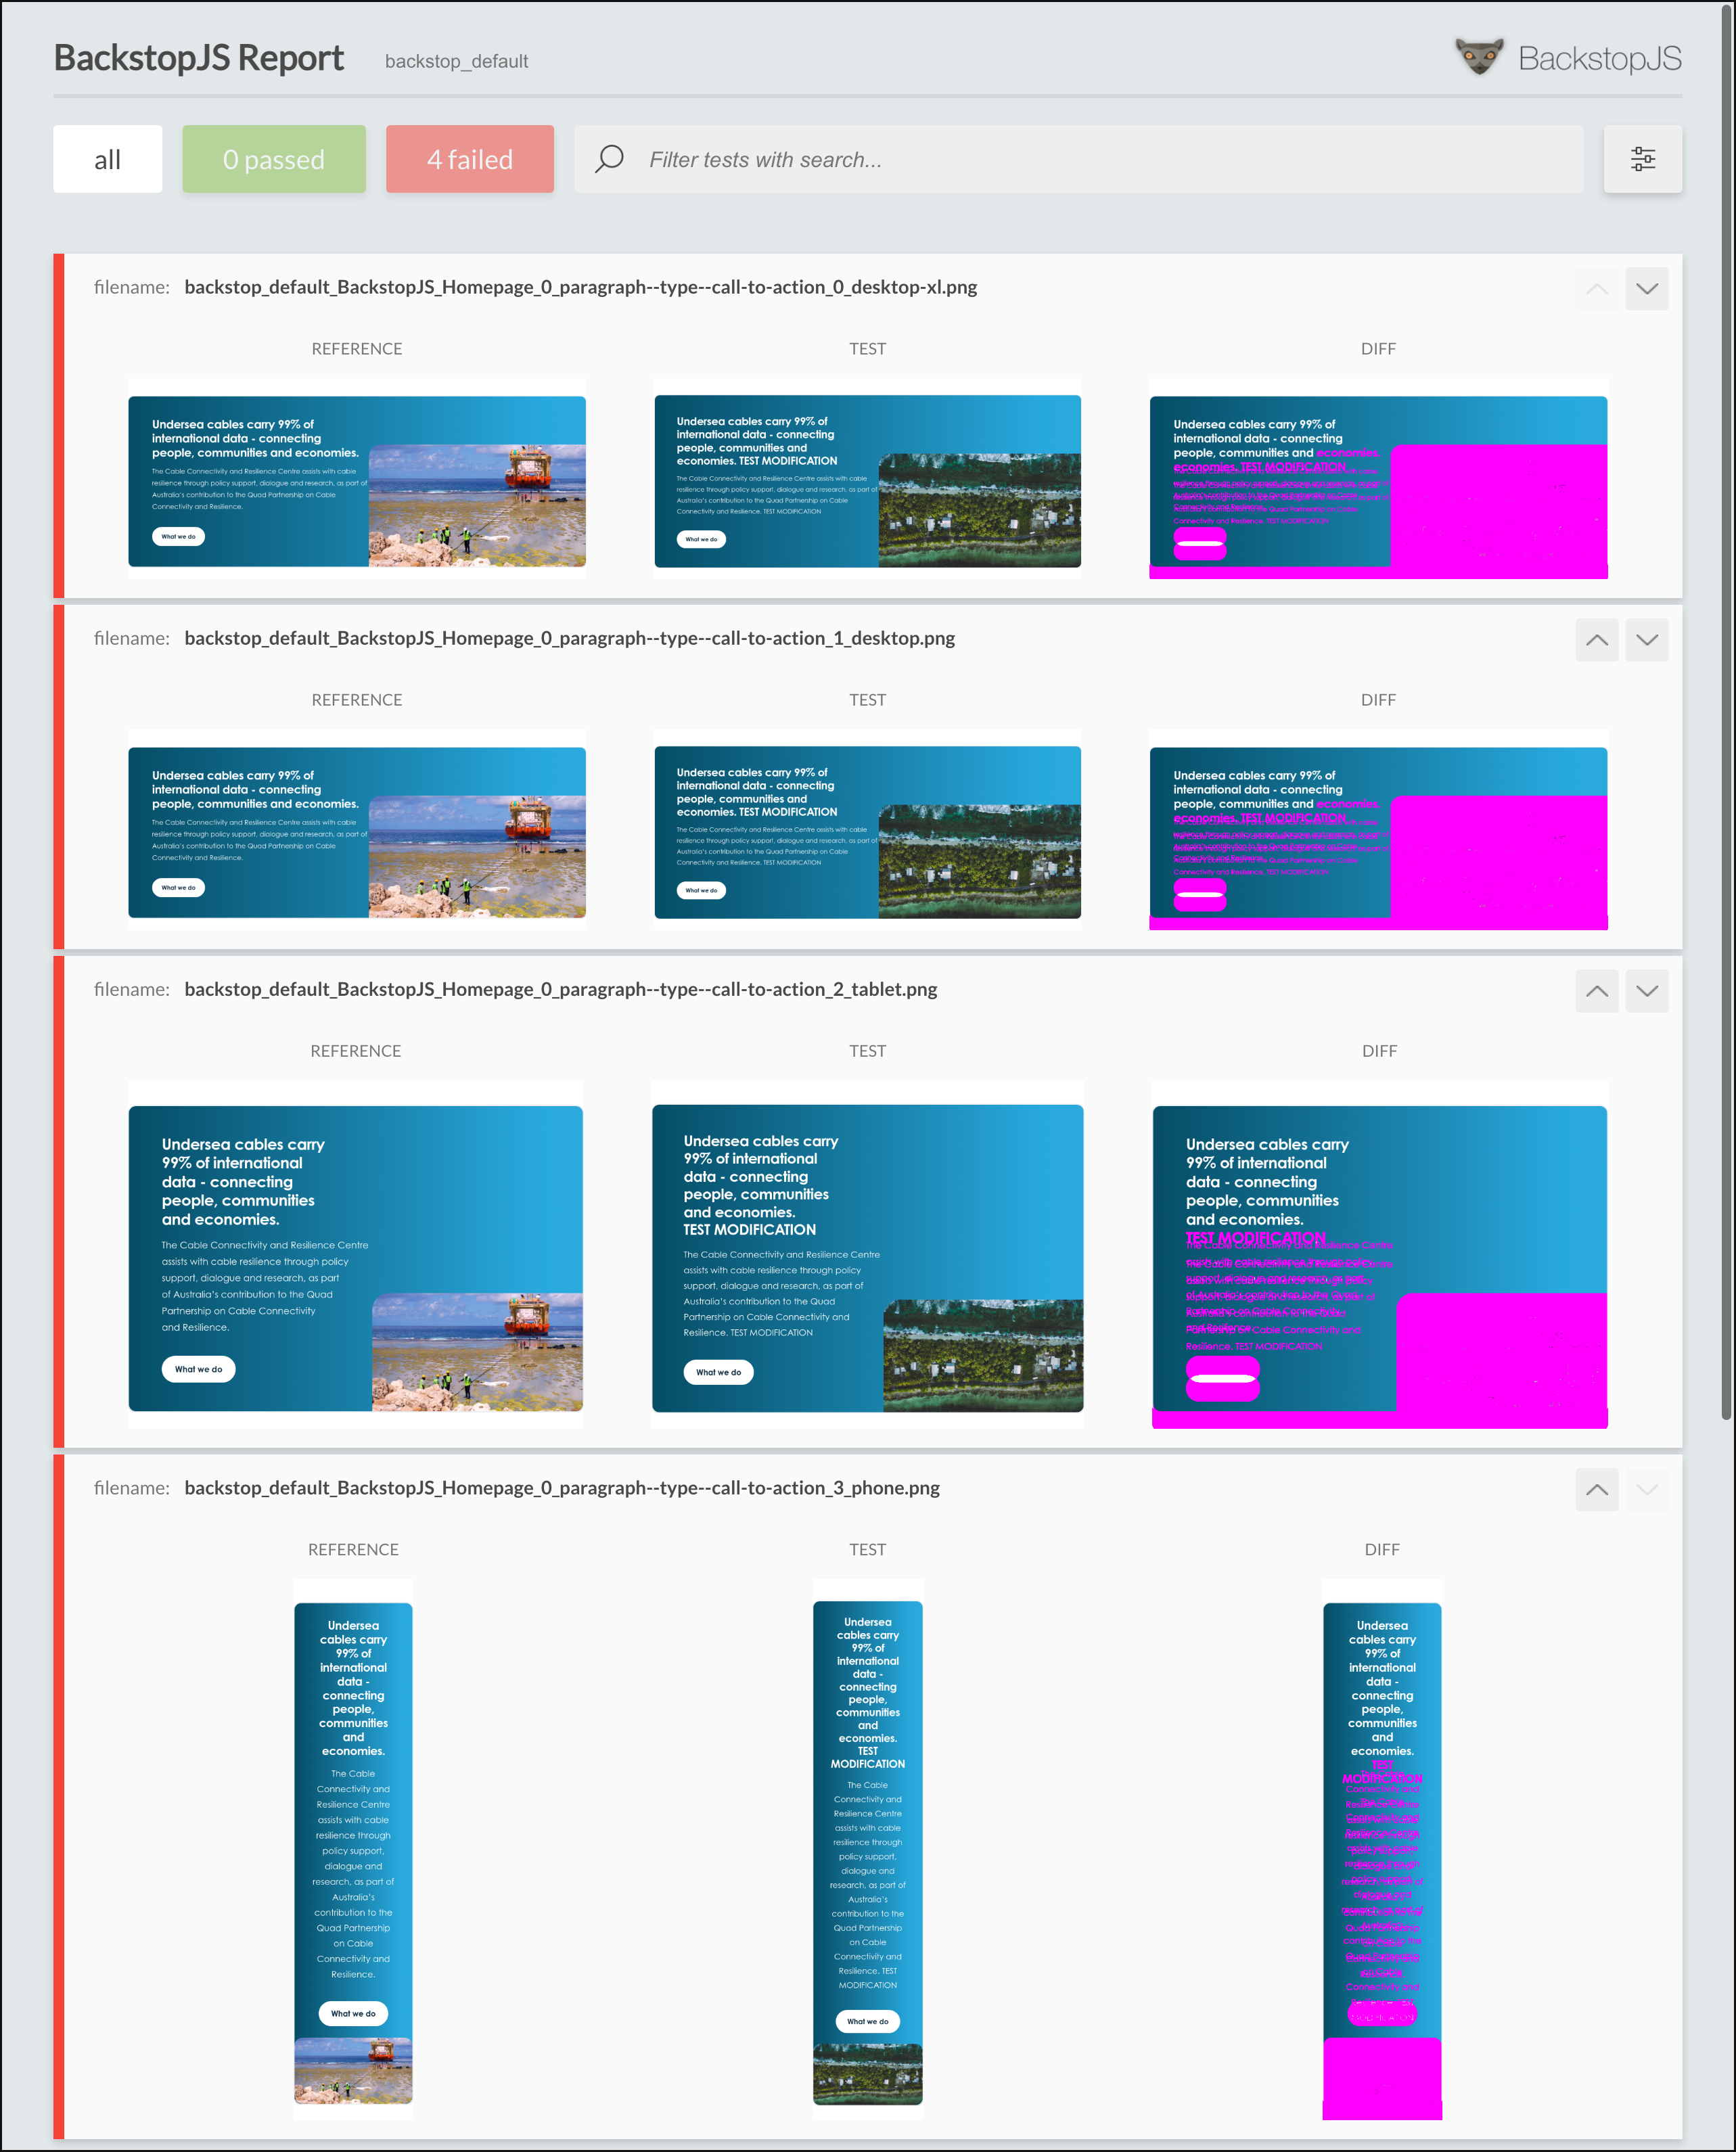
Finally, (after making some changes on the website) run (ahoy) backstop test to compare the current version of the website against the reference version stored previously in step3. A report will be generated to show the difference:
Other Properties in Config (Scenario Properties)
misMatchTreshold- percentage of different pixels allowed to pas the testhideSelectors- array of selectors set tovisibility:hiddenremoveSelectors- array of selectors set todisplay:nonedelay- wait for xx ms before test (useful in case you use javascript to render the element)readyEvent- wait until this string has been logged to the consolereadySelector- wait until this selector exists before continuingonBeforeScript- used to setup browser stage (e.g. cookie)
Hand-on Practical Use Case: D10 ~ D11 Upgrade
As developers you might not often need do regression testing – the change is usually very small, contained; But when it comes to upgrade may involve breaking change to styling, e.g. major version bump of theme/underlying library, or upgrade of Drupal core, I think some automated testing to compare the “before” and “after” may come in handy.
Below are the steps, on how you can do it in a ddev project:
install the backstop-js via command:
ddev add-on get mmunz/ddev-backstopjs&ddev restartinitialise the backstop-js configuration file:
ddev backstop initthen alter the
./tests/backstop/backstop.jsonfile (to change breakpoint + add multiple url to test)1 2 3 4 5 6 7 8 9 10 11 12 13 14 15 16 17 18 19 20 21 22 23 24 25 26 27 28 29 30 31 32 33 34 35 36 37 38 39 40 41 42 43 44 45 46 47 48 49 50 51 52 53 54 55 56 57 58 59 60 61 62 63 64 65 66 67 68 69 70 71 72 73 74 75{ "id": "backstop_default", "viewports": - {"label": "phone", "width": 320, "height": 480 }, - {"label": "tablet", "width": 1024, "height": 768 }, + {"label": "desktop-xl", "width": 2560, "height": 1440 }, + {"label": "desktop", "width": 1920, "height": 1080 }, + {"label": "tablet", "width": 1024, "height": 768 }, + {"label": "phone", "width": 320, "height": 480 } ], "onBeforeScript": "puppet/onBefore.js", "onReadyScript": "puppet/onReady.js", "scenarios": [ - { - "label": "BackstopJS Homepage", - "cookiePath": "backstop_data/engine_scripts/cookies.json", - "url": "", - "referenceUrl":"", - "readyEvent": "", - "readySelector": "", - "delay": 0, - "hideSelectors": [], - "removeSelectors": [], - "hoverSelector": "", - "clickSelector": "", - "postInteractionWait": 0, - "selectors": [], - "selectorExpansion": true, - "expect": 0, - "misMatchThreshold" : 0.1, - "requireSameDimensions": true - } ⬇️ compare local before & after the update + { "label": "Homepage", "url": "https://local-example.ddev.site", "hideSelectors": [], "removeSelectors": [], "selectors": ["document"],"readyEvent": null, "delay": 0, "misMatchThreshold": 0.1, "requireSameDimensions": true }, + { "label": "About Us", "url": "https://local-example.ddev.site/about-us", "hideSelectors": [], "removeSelectors": [], "selectors": ["document"],"readyEvent": null, "delay": 0, "misMatchThreshold": 0.1, "requireSameDimensions": true }, + { "label": "News and Publications", "url": "https://local-example.ddev.site/publications/news-and-publications", "hideSelectors": [], "removeSelectors": [], "selectors": ["document"],"readyEvent": null, "delay": 0, "misMatchThreshold": 0.1, "requireSameDimensions": true }, + { "label": "Sydney Seminars", "url": "https://local-example.ddev.site/events/sydney-seminarss", "hideSelectors": [], "removeSelectors": [], "selectors": ["document"],"readyEvent": null, "delay": 0, "misMatchThreshold": 0.1, "requireSameDimensions": true }, + { "label": "Search (query=hello)", "url": "https://local-example.ddev.site/search?search_api_fulltext=hello", "hideSelectors": [], "removeSelectors": [], "selectors": ["document"],"readyEvent": null, "delay": 0, "misMatchThreshold": 0.1, "requireSameDimensions": true }, + { "label": "FAQ", "url": "https://local-example.ddev.site/frequently-asked-questions", "hideSelectors": [], "removeSelectors": [], "selectors": ["document"],"readyEvent": null, "delay": 0, "misMatchThreshold": 0.1, "requireSameDimensions": true }, + { "label": "Webform (sign)", "url": "https://local-example.ddev.site/sign", "hideSelectors": [], "removeSelectors": [], "selectors": ["document"],"readyEvent": null, "delay": 0, "misMatchThreshold": 0.1, "requireSameDimensions": true } + ... (more URL that you want to test) + OR ⬇️ compare local and the production + { "label": "Homepage", "url": "https://local-example.ddev.site", "referenceUrl":"https://production-example.ddev.site", , "hideSelectors": [], "removeSelectors": [], "selectors": ["document"],"readyEvent": null, "delay": 0, "misMatchThreshold": 0.1, "requireSameDimensions": true }, + { "label": "About Us", "url": "https://local-example.ddev.site/about-us", "referenceUrl":"https://production-example.ddev.site/about-us", , "hideSelectors": [], "removeSelectors": [], "selectors": ["document"],"readyEvent": null, "delay": 0, "misMatchThreshold": 0.1, "requireSameDimensions": true }, + { "label": "News and Publications", "url": "https://local-example.ddev.site/publications/news-and-publications", "referenceUrl":"https://production-example.ddev.site/publications/news-and-publications", , "hideSelectors": [], "removeSelectors": [], "selectors": ["document"],"readyEvent": null, "delay": 0, "misMatchThreshold": 0.1, "requireSameDimensions": true }, + { "label": "Sydney Seminars", "url": "https://local-example.ddev.site/events/sydney-seminarss", "referenceUrl":"https://production-example.ddev.site/events/sydney-seminarss", , "hideSelectors": [], "removeSelectors": [], "selectors": ["document"],"readyEvent": null, "delay": 0, "misMatchThreshold": 0.1, "requireSameDimensions": true }, + { "label": "Search (query=hello)", "url": "https://local-example.ddev.site/search?search_api_fulltext=hello", "referenceUrl":"https://production-example.ddev.site/search?search_api_fulltext=hello", , "hideSelectors": [], "removeSelectors": [], "selectors": ["document"],"readyEvent": null, "delay": 0, "misMatchThreshold": 0.1, "requireSameDimensions": true }, + { "label": "FAQ", "url": "https://local-example.ddev.site/frequently-asked-questions", "referenceUrl":"https://production-example.ddev.site/frequently-asked-questions", , "hideSelectors": [], "removeSelectors": [], "selectors": ["document"],"readyEvent": null, "delay": 0, "misMatchThreshold": 0.1, "requireSameDimensions": true }, + { "label": "Webform (sign)", "url": "https://local-example.ddev.site/sign", "referenceUrl":"https://production-example.ddev.site/sign", , "hideSelectors": [], "removeSelectors": [], "selectors": ["document"],"readyEvent": null, "delay": 0, "misMatchThreshold": 0.1, "requireSameDimensions": true } + ... (more URL that you want to test) ], "paths": { "bitmaps_reference": "backstop_data/bitmaps_reference", "bitmaps_test": "backstop_data/bitmaps_test", "engine_scripts": "backstop_data/engine_scripts", "html_report": "backstop_data/html_report", "ci_report": "backstop_data/ci_report" }, "report": ["browser"], "engine": "puppeteer", "engineOptions": { "args": ["--no-sandbox"] }, "asyncCaptureLimit": 5, "asyncCompareLimit": 50, "debug": false, "debugWindow": false }- run test and approve (to use the pixel map of these page’s current state as reference later to test), via command:
ddev backstop test&ddev backstop approve - (update theme / drupal core as your normally do…)
- re-run the test to compare before and after the update, run command
ddev backstop test - open the report to check difference:
ddev backstop-result
- run test and approve (to use the pixel map of these page’s current state as reference later to test), via command:
Common Error
Error-1: Error: net::ERR_CONNECTION_REFUSED
Example error:
| |
This is because in file .ahoy.yml, you have forgotten to replace the project name:
| |
Reference
- Drupal South - Canberra Nov 2025 - Visual regression testing: BackstopJS for the win by Marji Cermak (link)
- https://www.browserstack.com/percy/visual-regression-testing
- https://github.com/garris/BackstopJS#the-backstopjs-workflow
- https://garris.github.io/BackstopJS/
- https://github.com/mmunz/ddev-backstopjs