Intuition
Drupal is a content-management-system, it gives the website admins (and content authors) the convinience to access and editing the content via the backend console, whilst provide the ability to render these contentt into visually appealing pages for visitors. However, what if one would to try to access the website content from a third-party software, and to manage the content via those softwares (let’s say for instance, a NextJS web application, or IOS/Android app).
This is where JSON:API module will come in handy, it provides a standardized way for client to access Druapl content (as a service), it helps integrating Drupal with the aforementioned software/system, and reducing the need for custom development and ensuring consistency across projects.
Configuration & Usage
To have the JSON:API functionally working on your website, you will need a combination of the following modules:
Serialisation: provides a framework to add serialization to drupal, for instance, turning nodes into JSON format
JSON:API: zero-configuration required, opinionated, way to allow RESTful CRUD for a Drupal site’s content
One of the following authentication modules (to authenticate the REST requests)
- HTTP Basic Authentication: implements the HTTP Basic protocol, in which the username and password are encoded and added to the Authorization header within the request
- Simple OAuth (OAuth2) & OpenID Connect: enables secure third-party authentication and authorization through industry-standard OAuth2 and OpenID Connect protocols. It allows users to log into a Drupal site using credentials from external providers (like Google or Facebook) while giving developers fine-grained control over API access permissions without sharing passwords directly.
The reason you might choose “Simple OAuth” over “HTTP Basic Auth” is because: it uses access tokens instead of transmitting user credentials (username + password) with each HTTP request, reducing the risk of exposing sensitive data like passwords. Tokens can be scoped and have expiration times, offering better control and security.
Configuration Steps for “HTTP Basic Authentications”
Simply enable all three modules via the backend console, or drush command:
| |
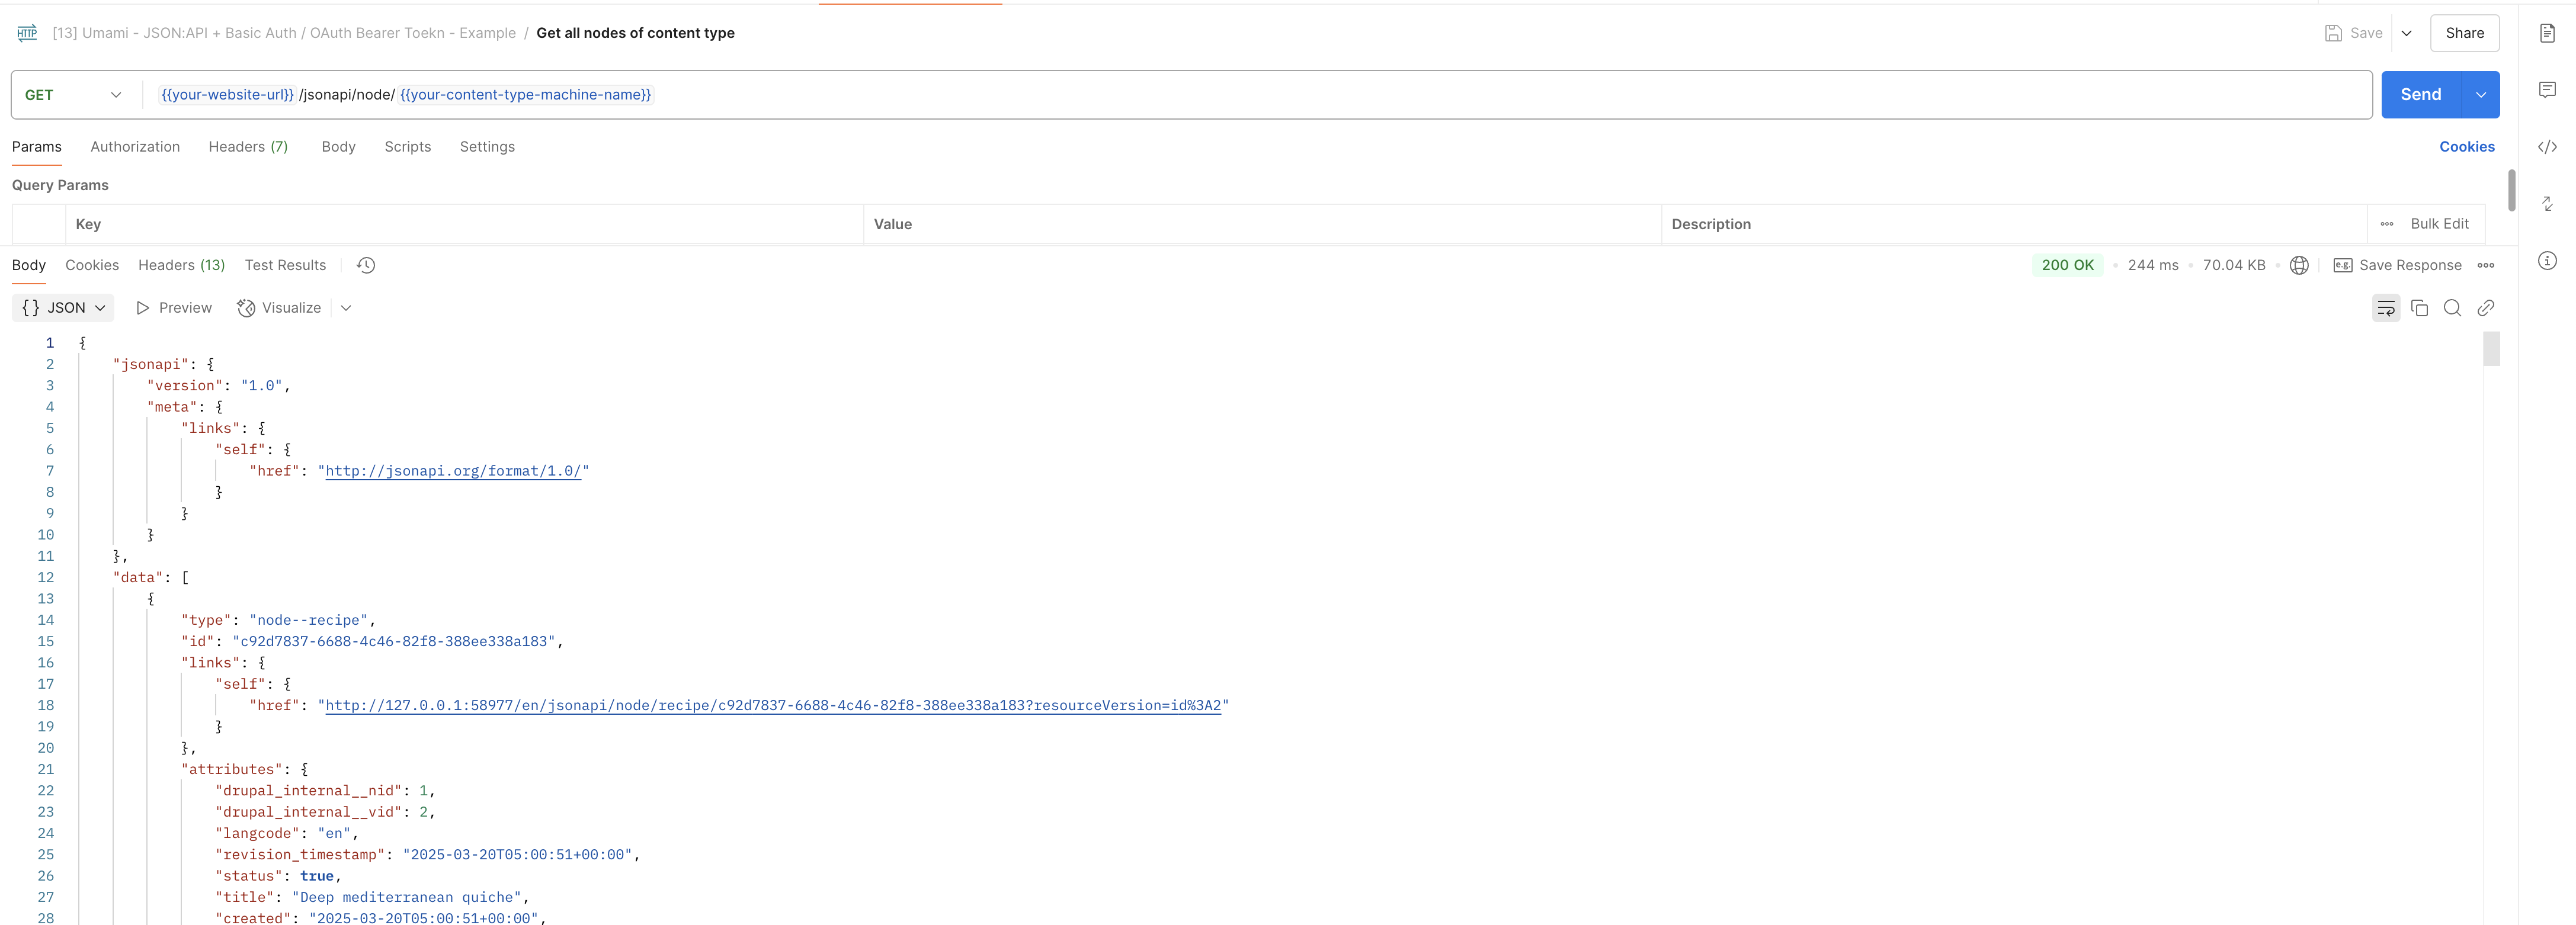
And you are good to go, instantly, you can accessing the nodes via curl command or postman:
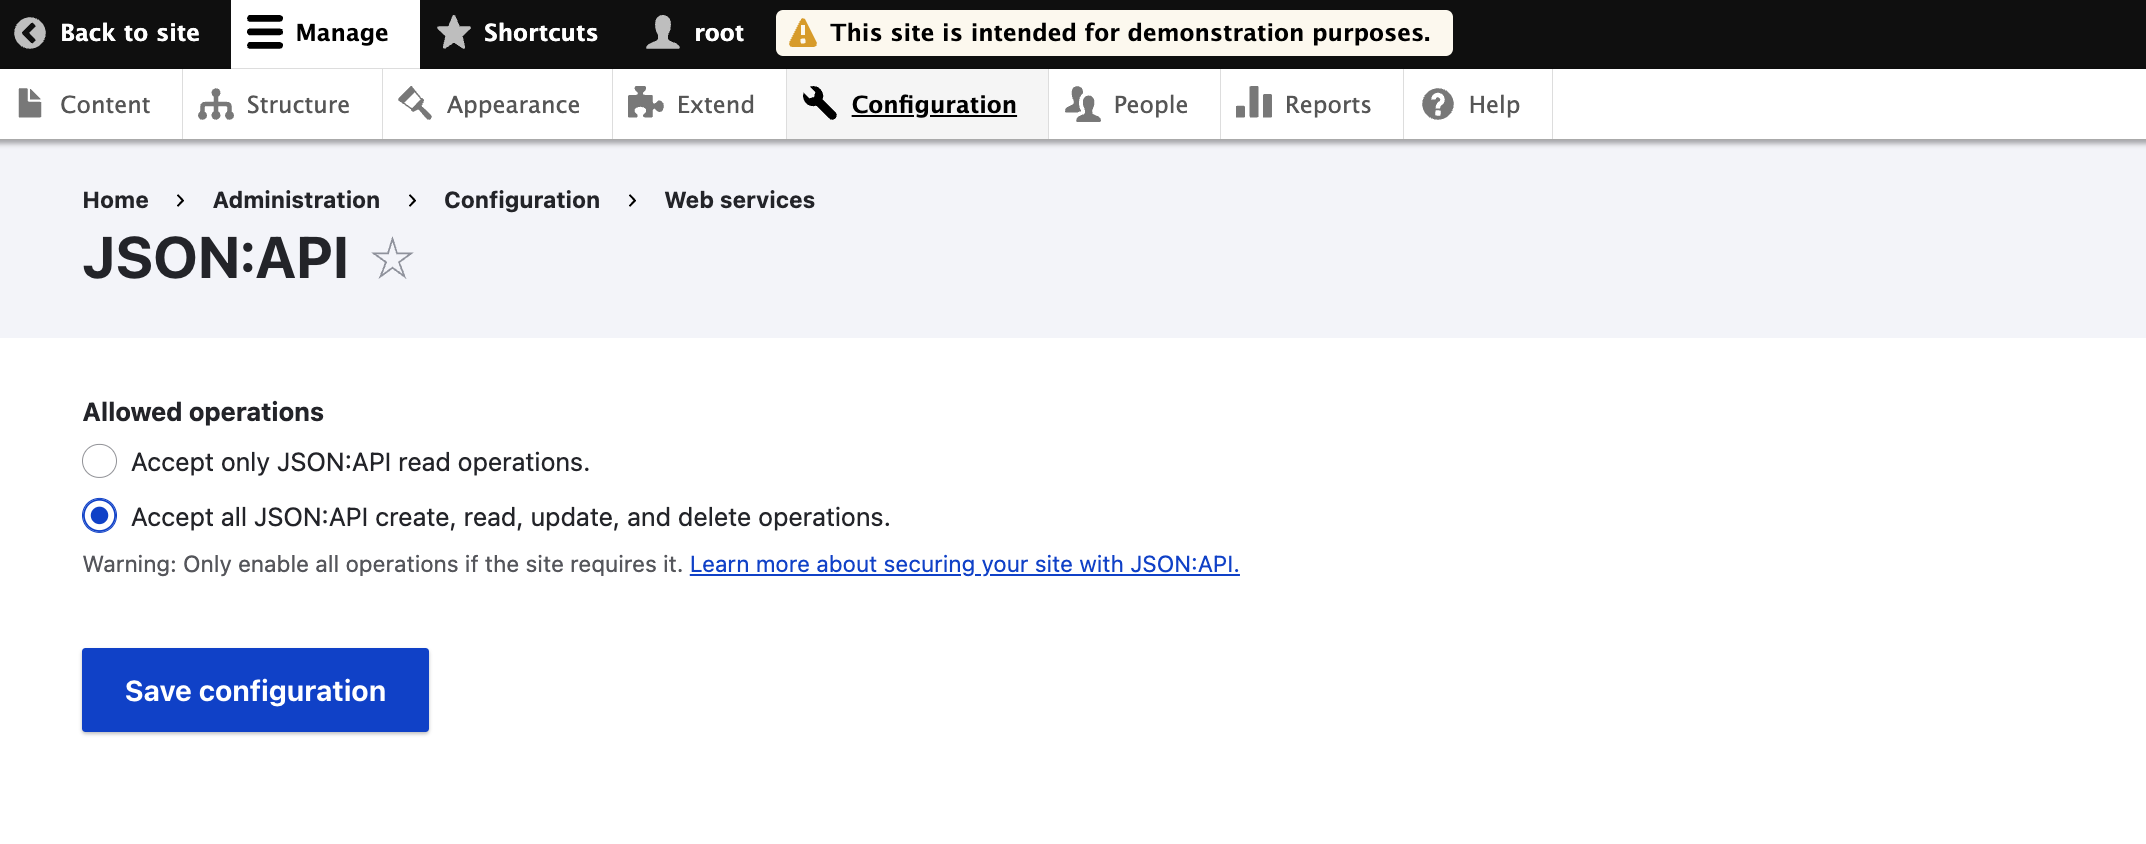
If you would like to enable JSON:API’s capability to create/update/delete content, you can also proceed to its configuration “/admin/config/services/jsonapi”, and change the “Allowed Operations”:
Configuration Steps for “Simple OAuth (Bearer Token)”
If you aim for higher standards for security, and want to have control over the expiry of access, then you may use the “Simple OAuth” module. After successfully setting up this module, intead of using “Basic Auth=User+Password” in your requests, you will first generate an Bearer Token using one of its provided endpoint (/oauth/token) then use “Bearer Toekn=xxyzzz” as your authentication method in all the upcoming request.
To begin with, like the previous setup section, install all three modules via console or drush:
| |
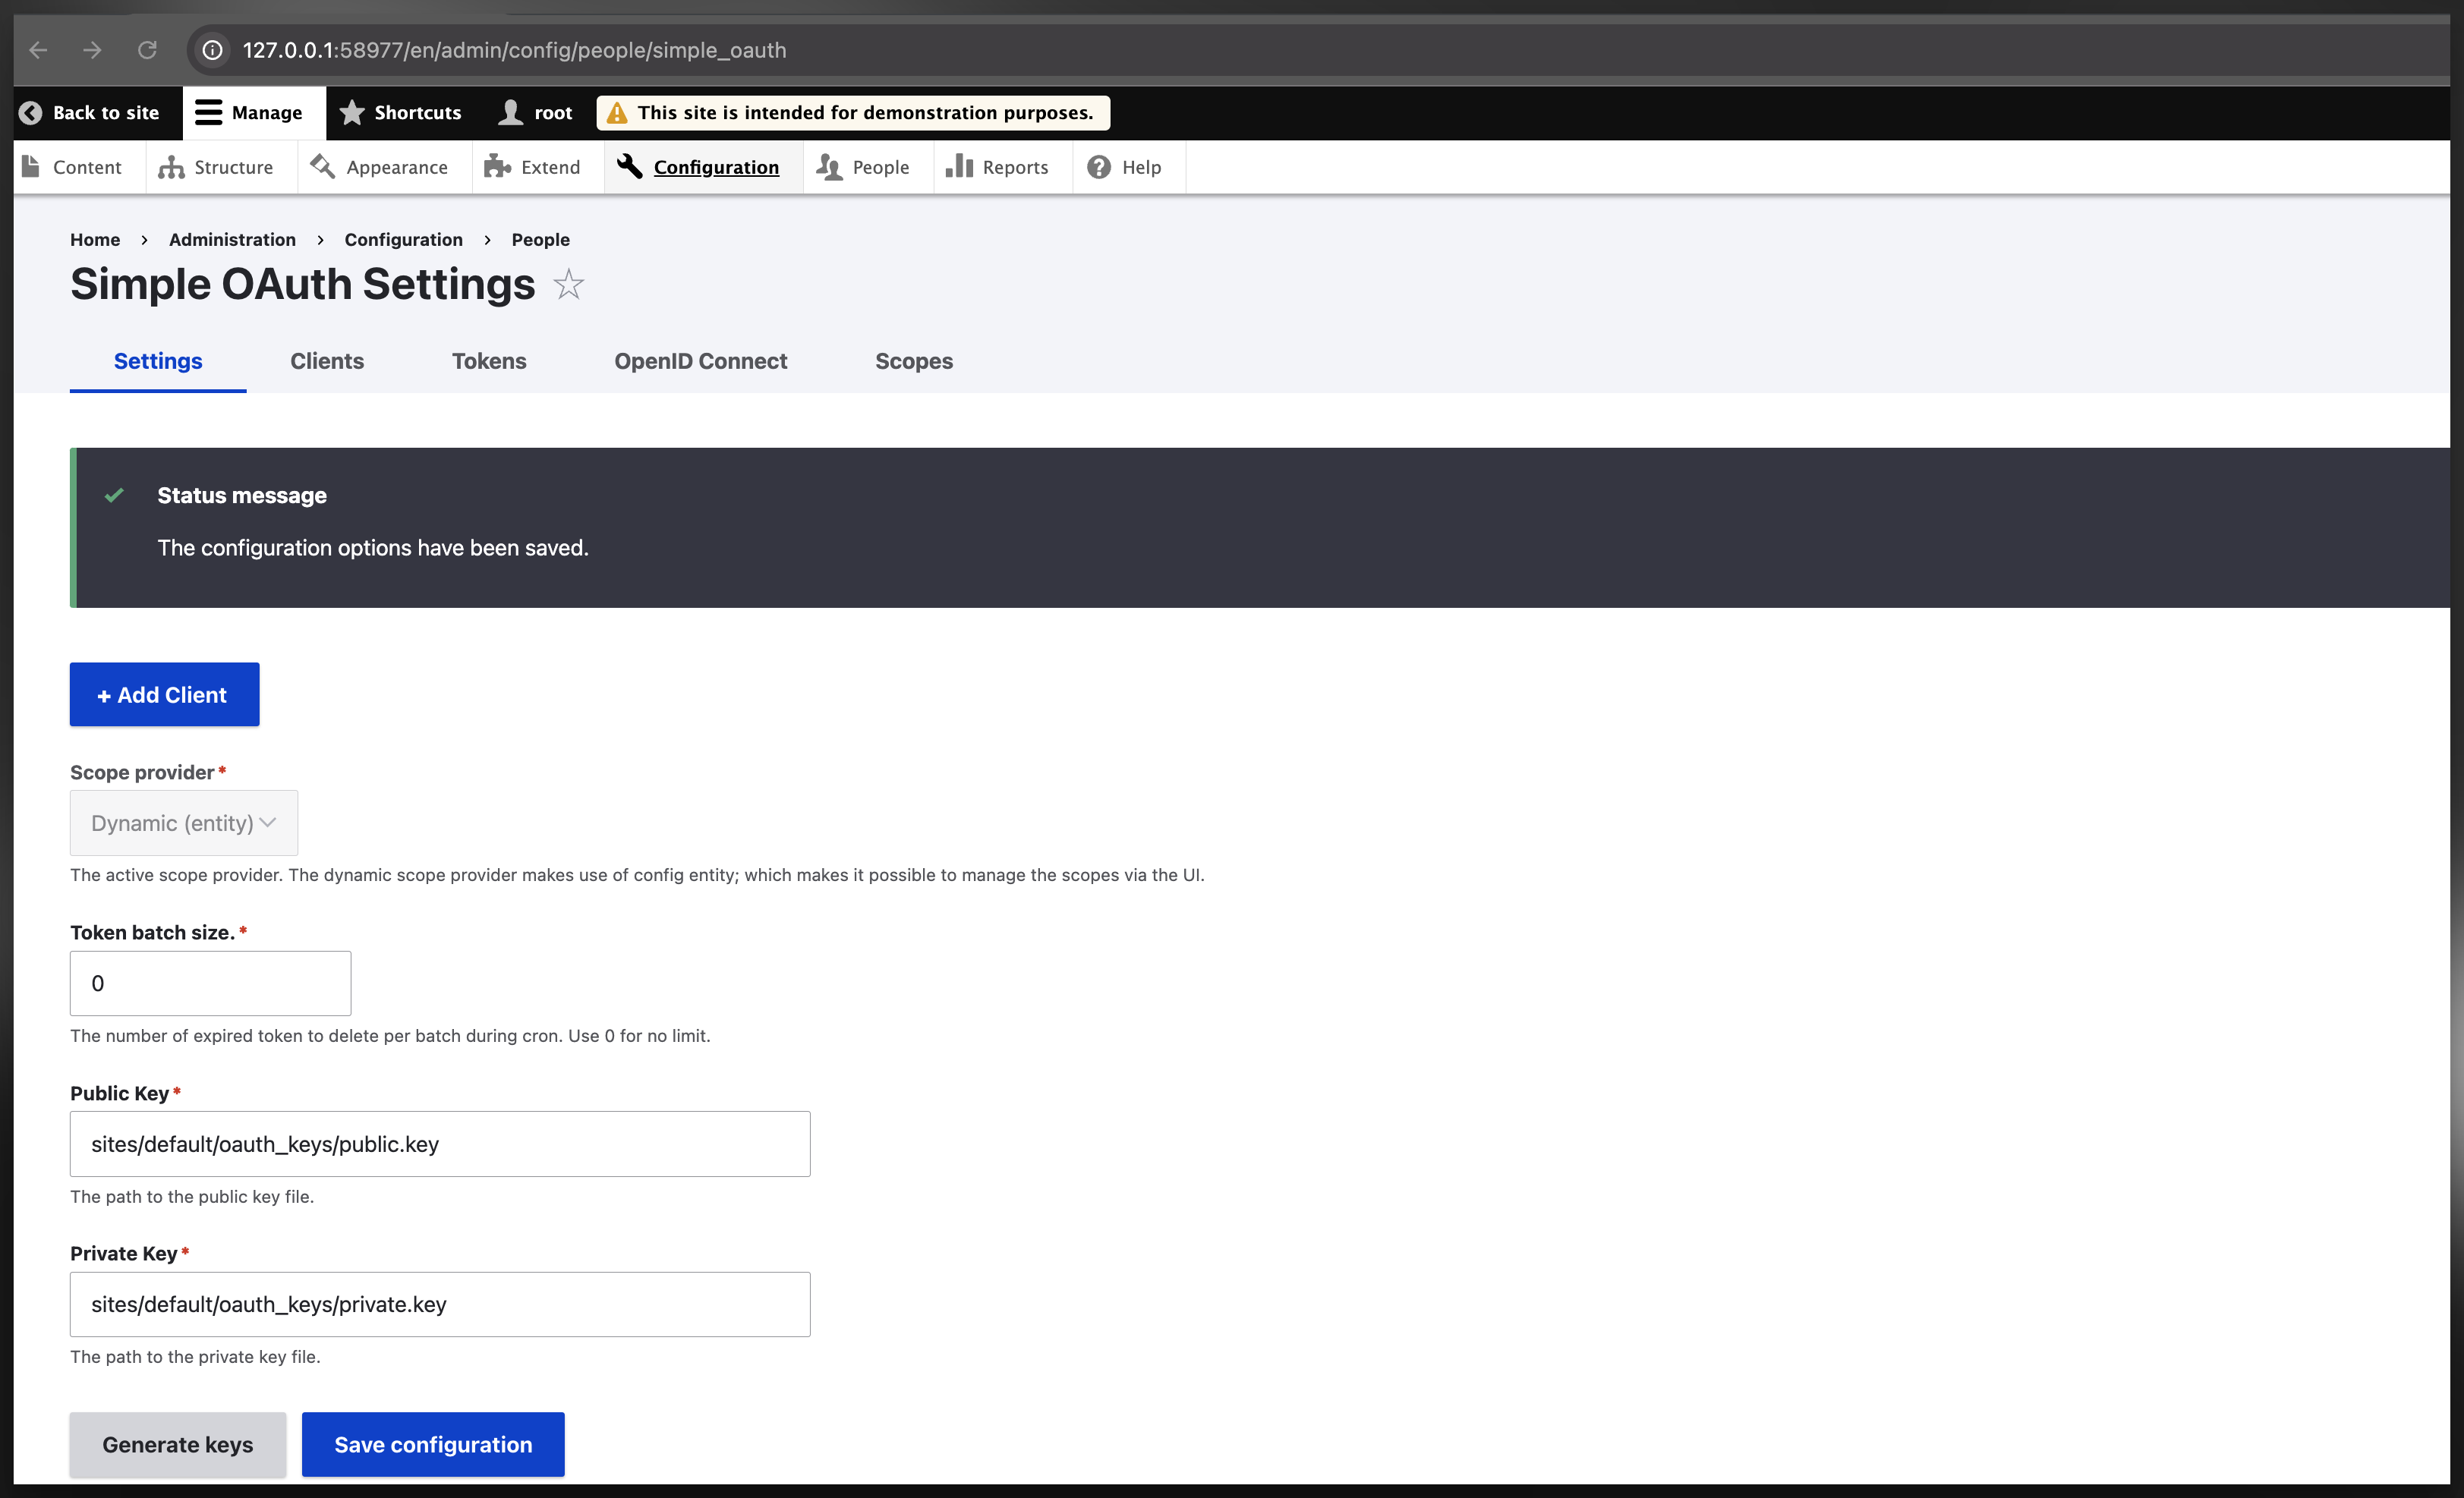
Then after that, briefly you’ll need to configure the OAuth module on “Administration > Configuration > People > Simple OAuth Setting ” (or checkout url “/admin/config/people/simple_oauth”) by adding the public/private key used for generating the bearer key (and authenticating), and create the consumer/client which can create Bearer Token. Once all setup you can use the /oauth/token API endpoint to generarte Bearer Tokens and use then in your JSON:API requests.
Step-1: setting up private/public key
Generate a pair of keys to encrypt the tokens. And store them outside of your document root for security reasons, and configure it on the first tab of the OAuth configuration page at “/admin/config/people/simple_oauth”:
| |
Step-2: create a scope and consumer/client
First let’s understand some terminologies:
- Scope: In Simple OAuth module, scope is a mechanism used to define and limit what operations an API consumer (such as an application or client) is allowed to perform on behalf of a user. Scopes are an integral part of OAuth 2.0, providing fine-grained control over access to resources.
- Consumer/Client : In Simple OAuth module, a consumer is an external application or client that requests access to a Drupal site using OAuth tokens to authenticate and authorize API requests.
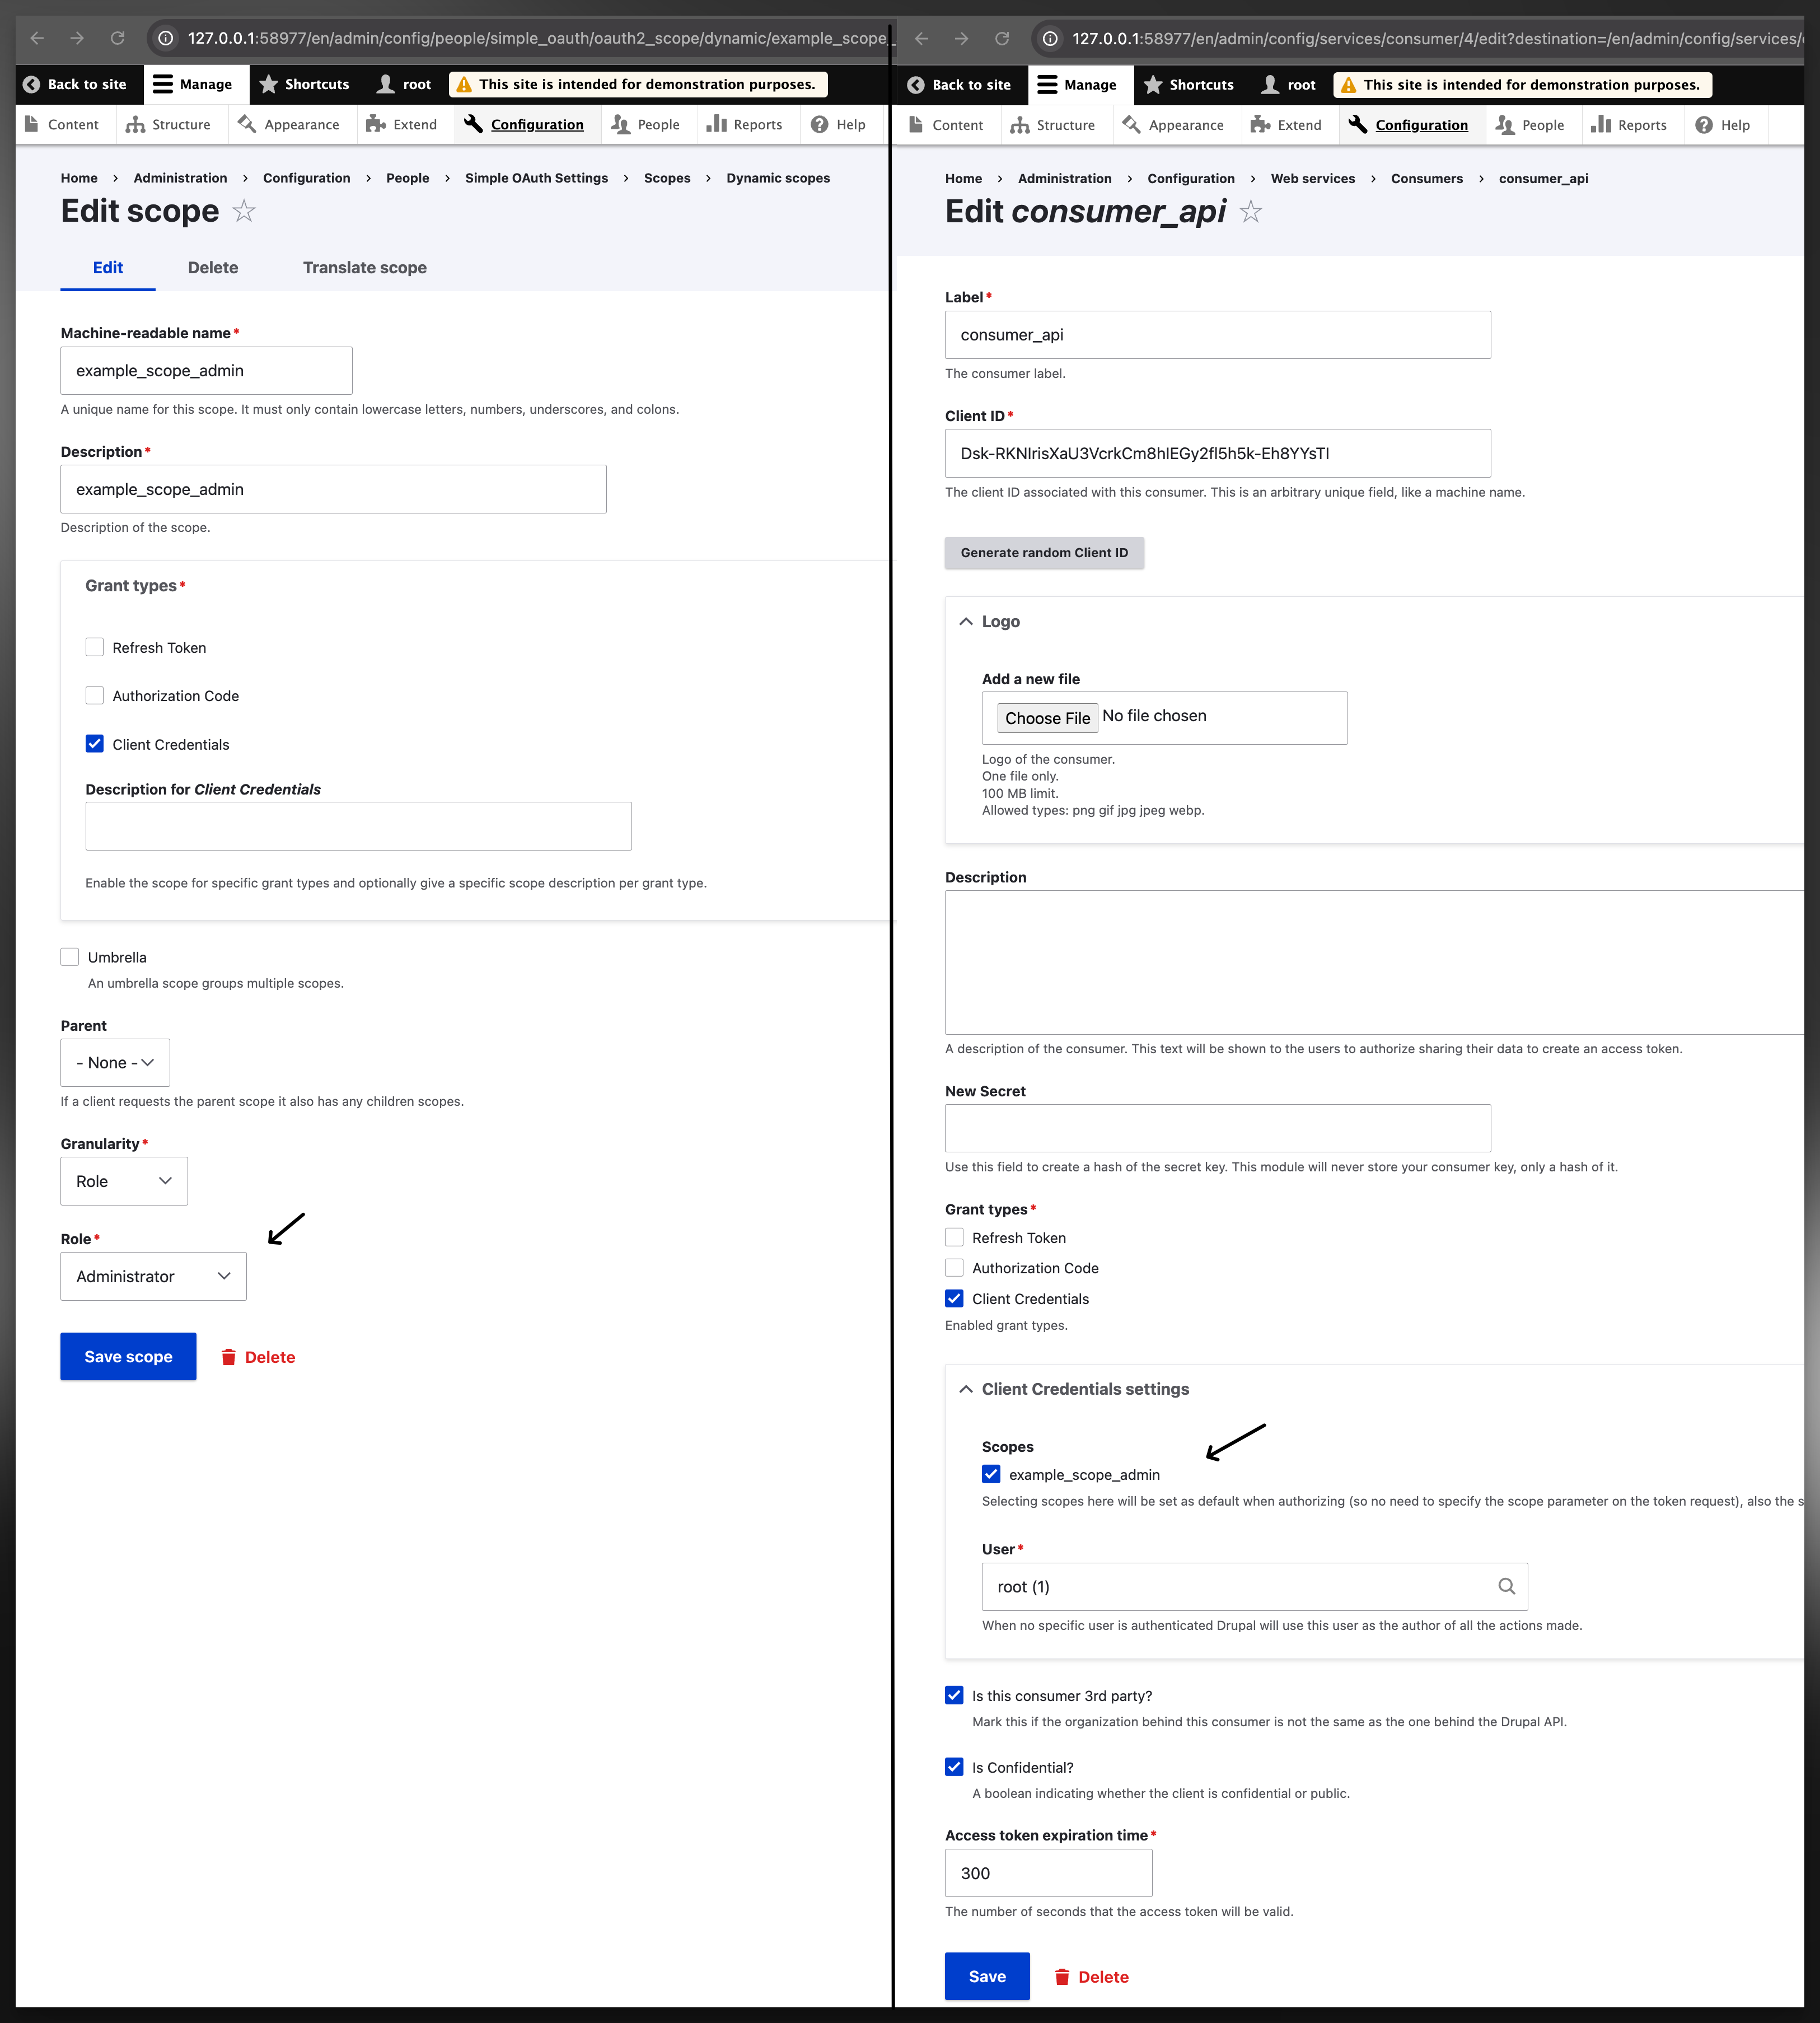
To proceed, you should first create a scope to define the necessary permissions (to perform all JSON:API tasks, such as creating, deleting, or modifying nodes). Then, you should create a consumer/client with Client Credential as the grant type, and the created example_scope_admin scope as scope; You also need to configure default user, this user will be used to perform the token grant when you do not specify one in the API call (will be mentioned later). Additionally, you can make the token to expire after a specific period if desired using the “Access token expiration time”.
Step-3: request for bearer token
Grant using: client_credentials + username/password
When everything’s setup in Step-2, you can reqeuest for your bearer token via curl or postman with the following body (If it doesn’t work then you may try this article: https://www.drupal.org/docs/contributed-modules/api-authentication/setup-access-token-oauth-based-authentication).
| |
| |
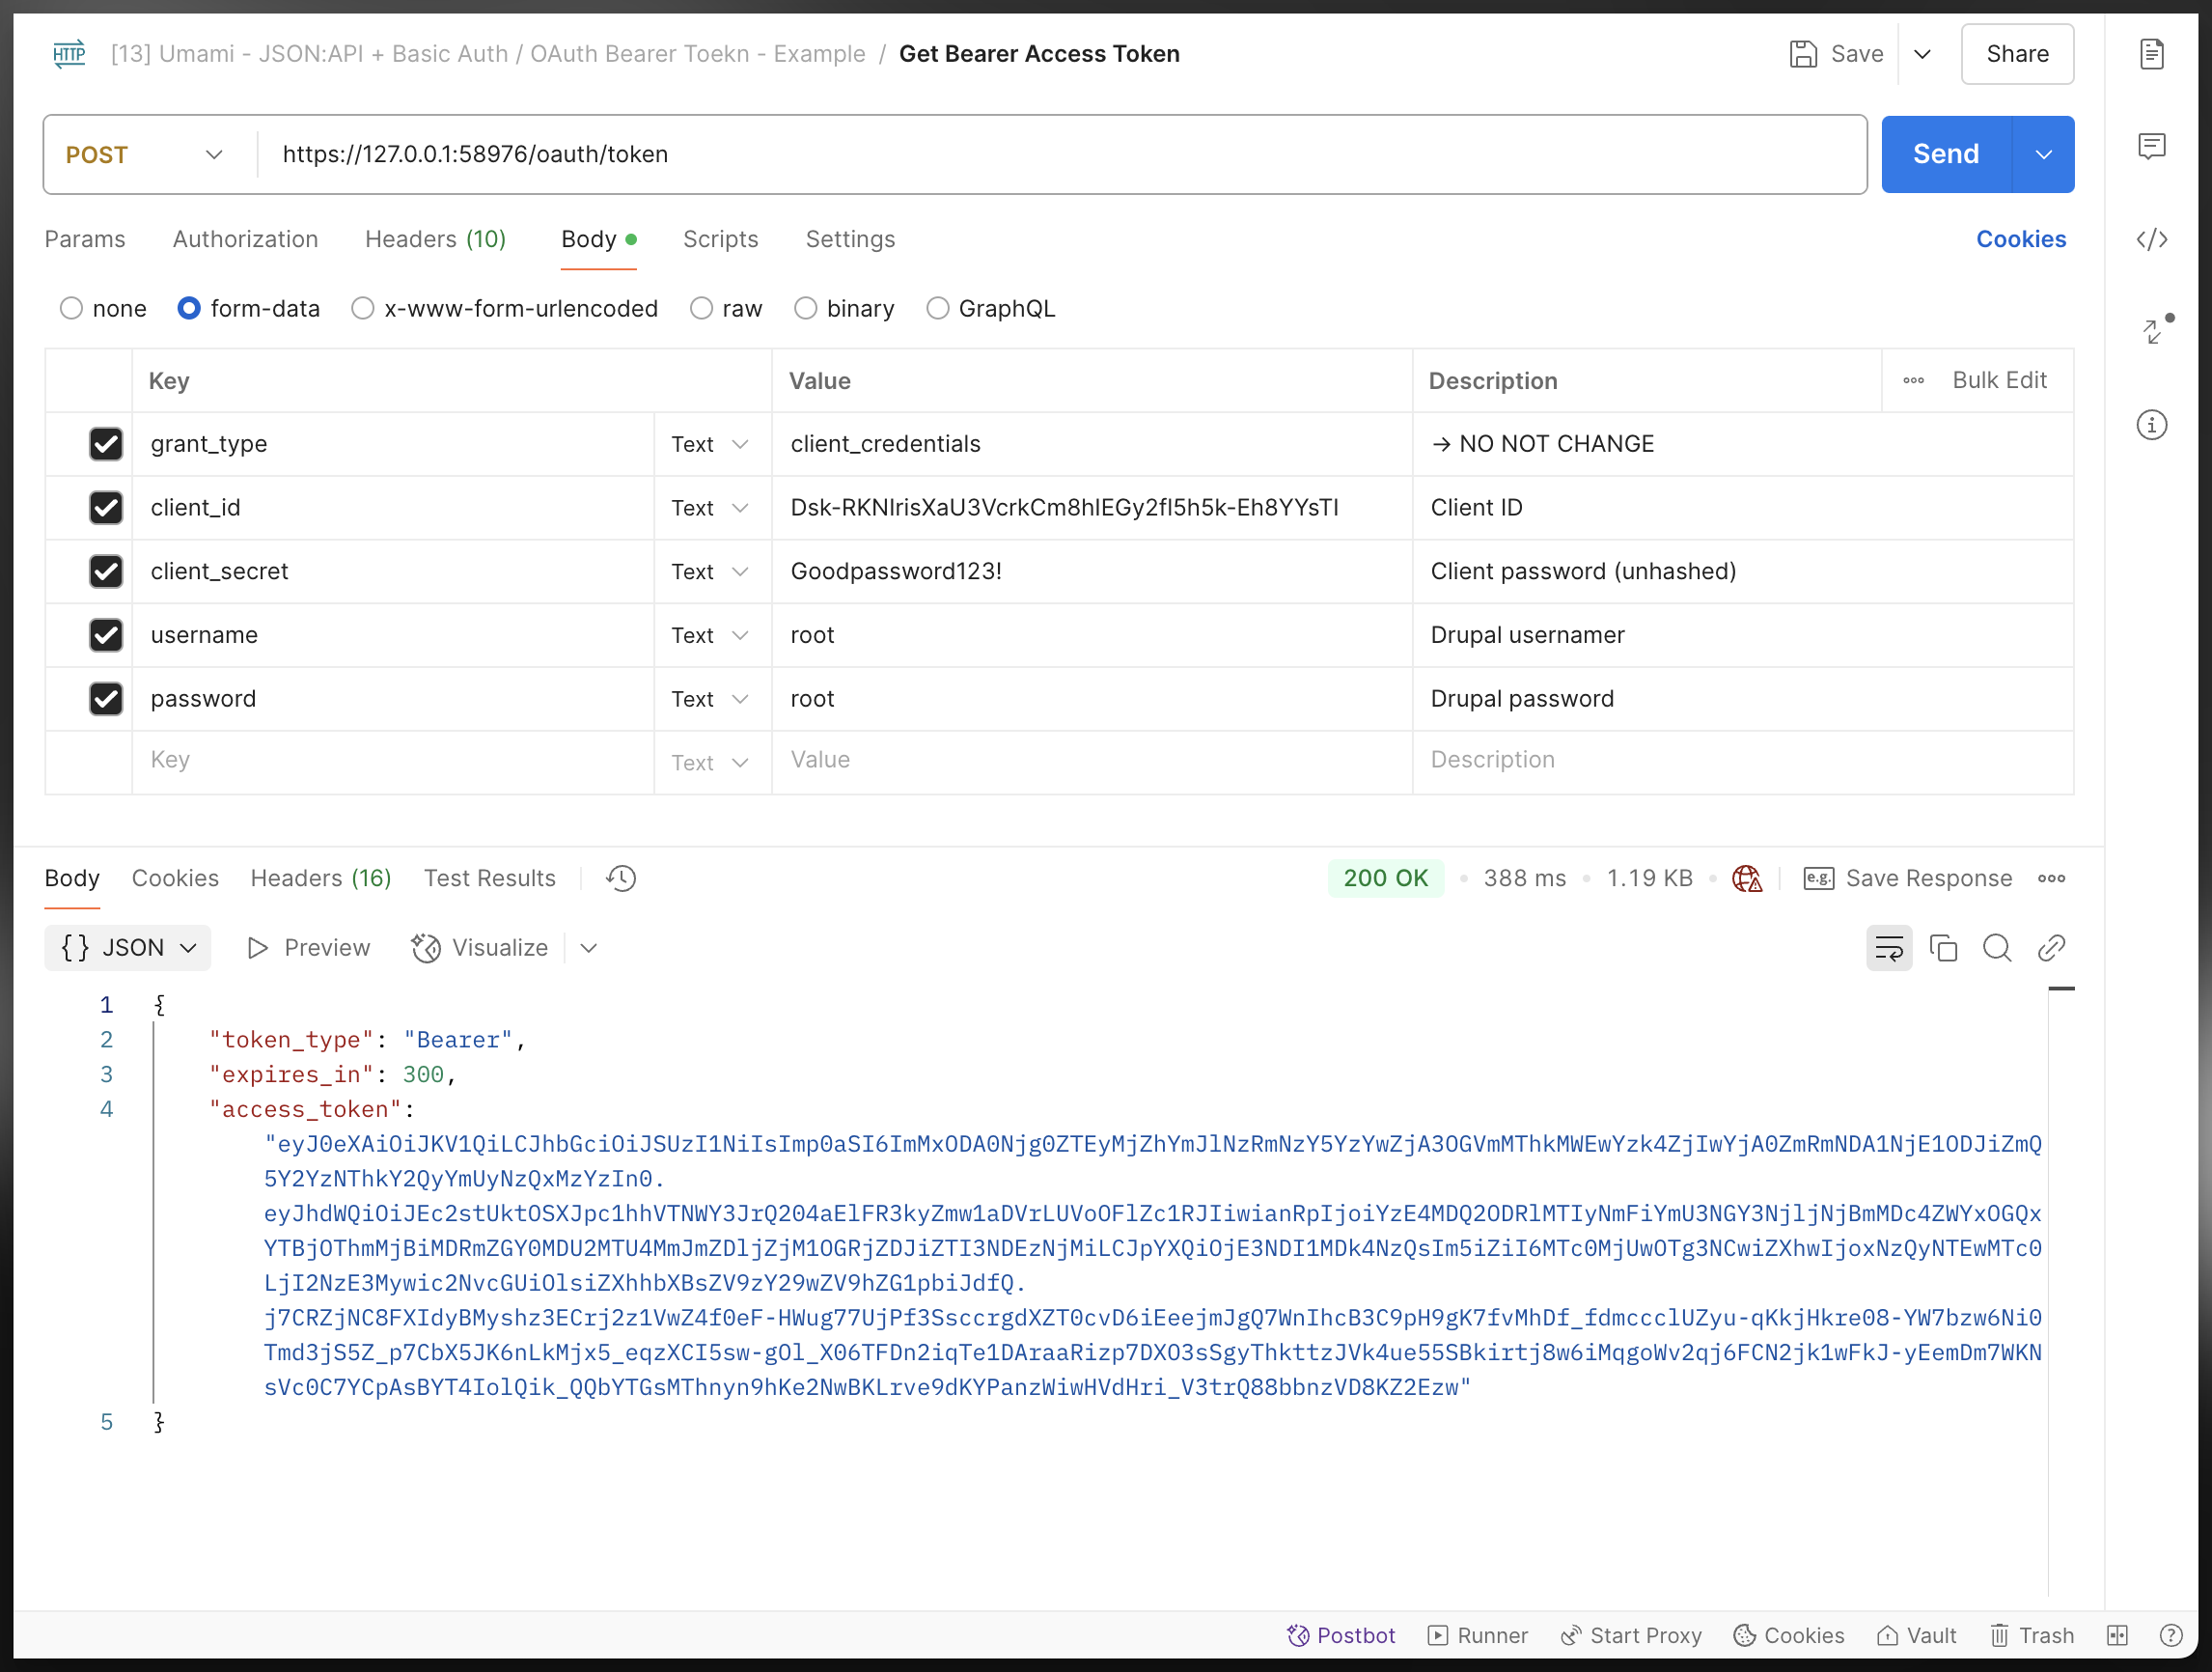
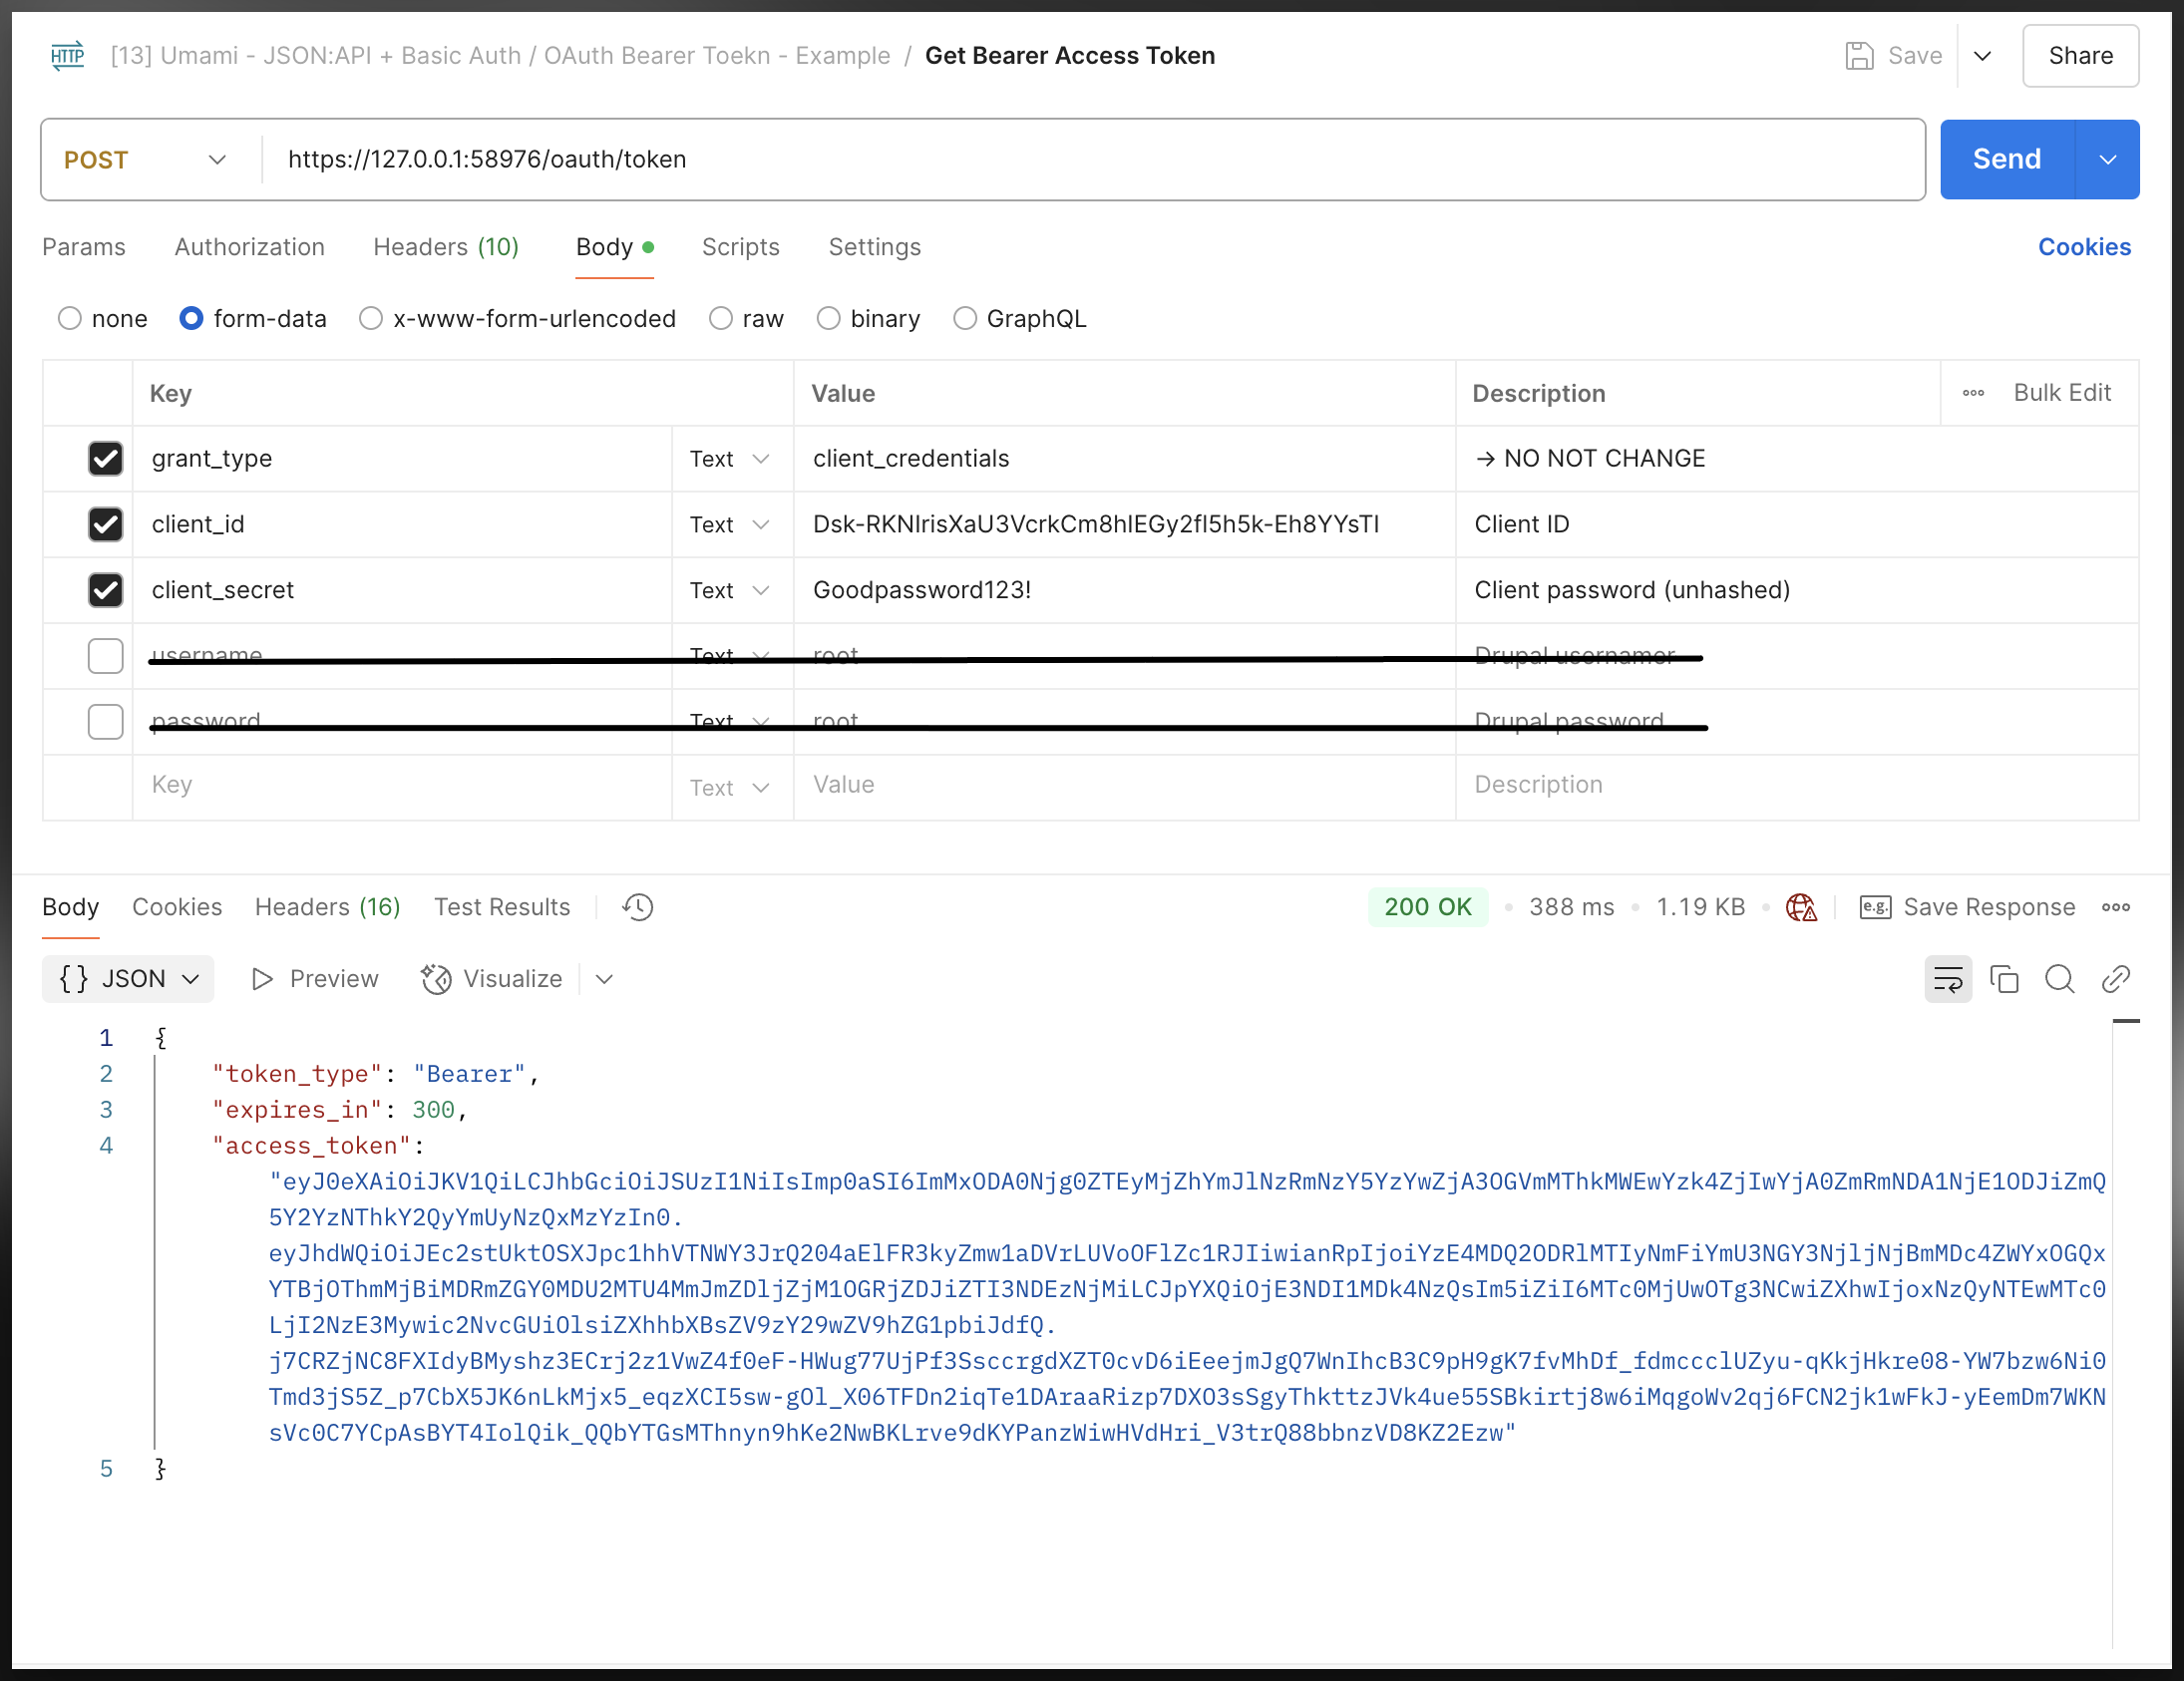
Grant using: client_credentials (only)
Also note that you do not necessaily have to provide a “username” and “password” when you are using “client credentials” as the grant type, as it provides a “default user” to perform the grant:
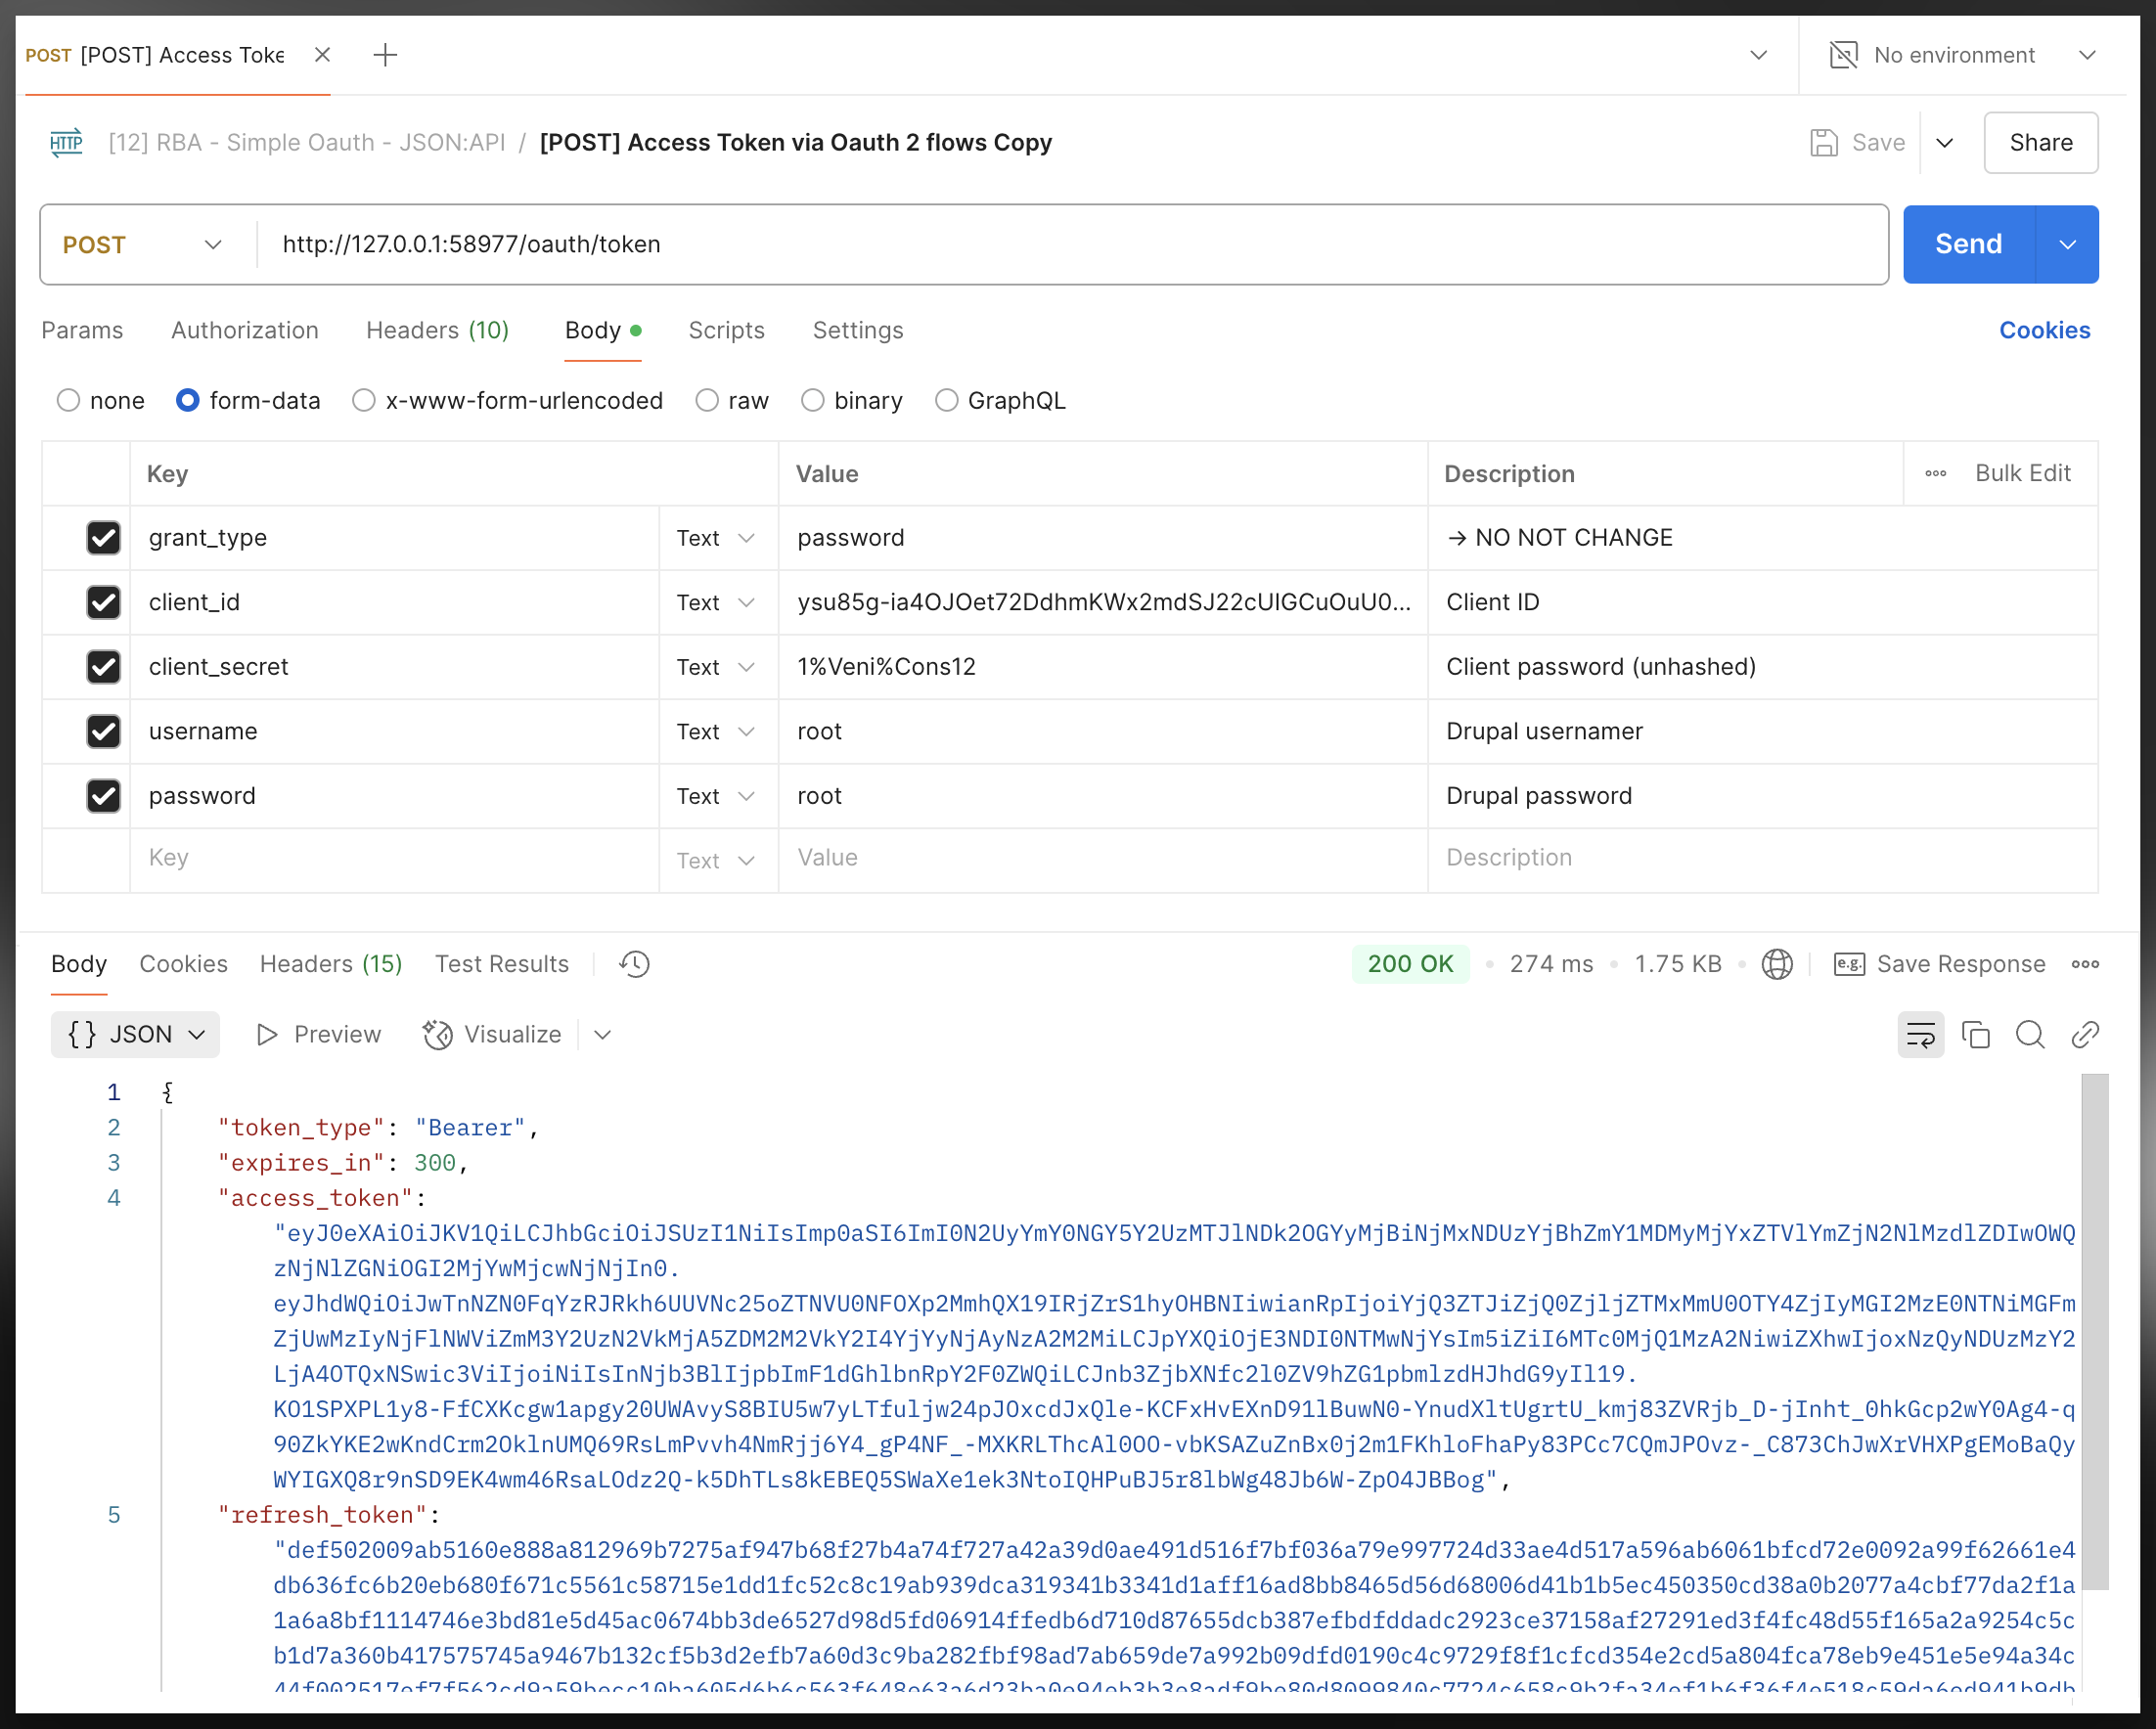
Grant using: password + username/password
Sometimes if you might get the following 404 bad/error response even if you are requesting with the right parameters, this maybe because you are using a different version of the OAuth module (or you are in the GovCMS environment and OAuth is configured slightly differently). In that case you may try to use password as the grant-type before start digging elsewhere to debug:
| |
| |
Step-4: request use the bearer token
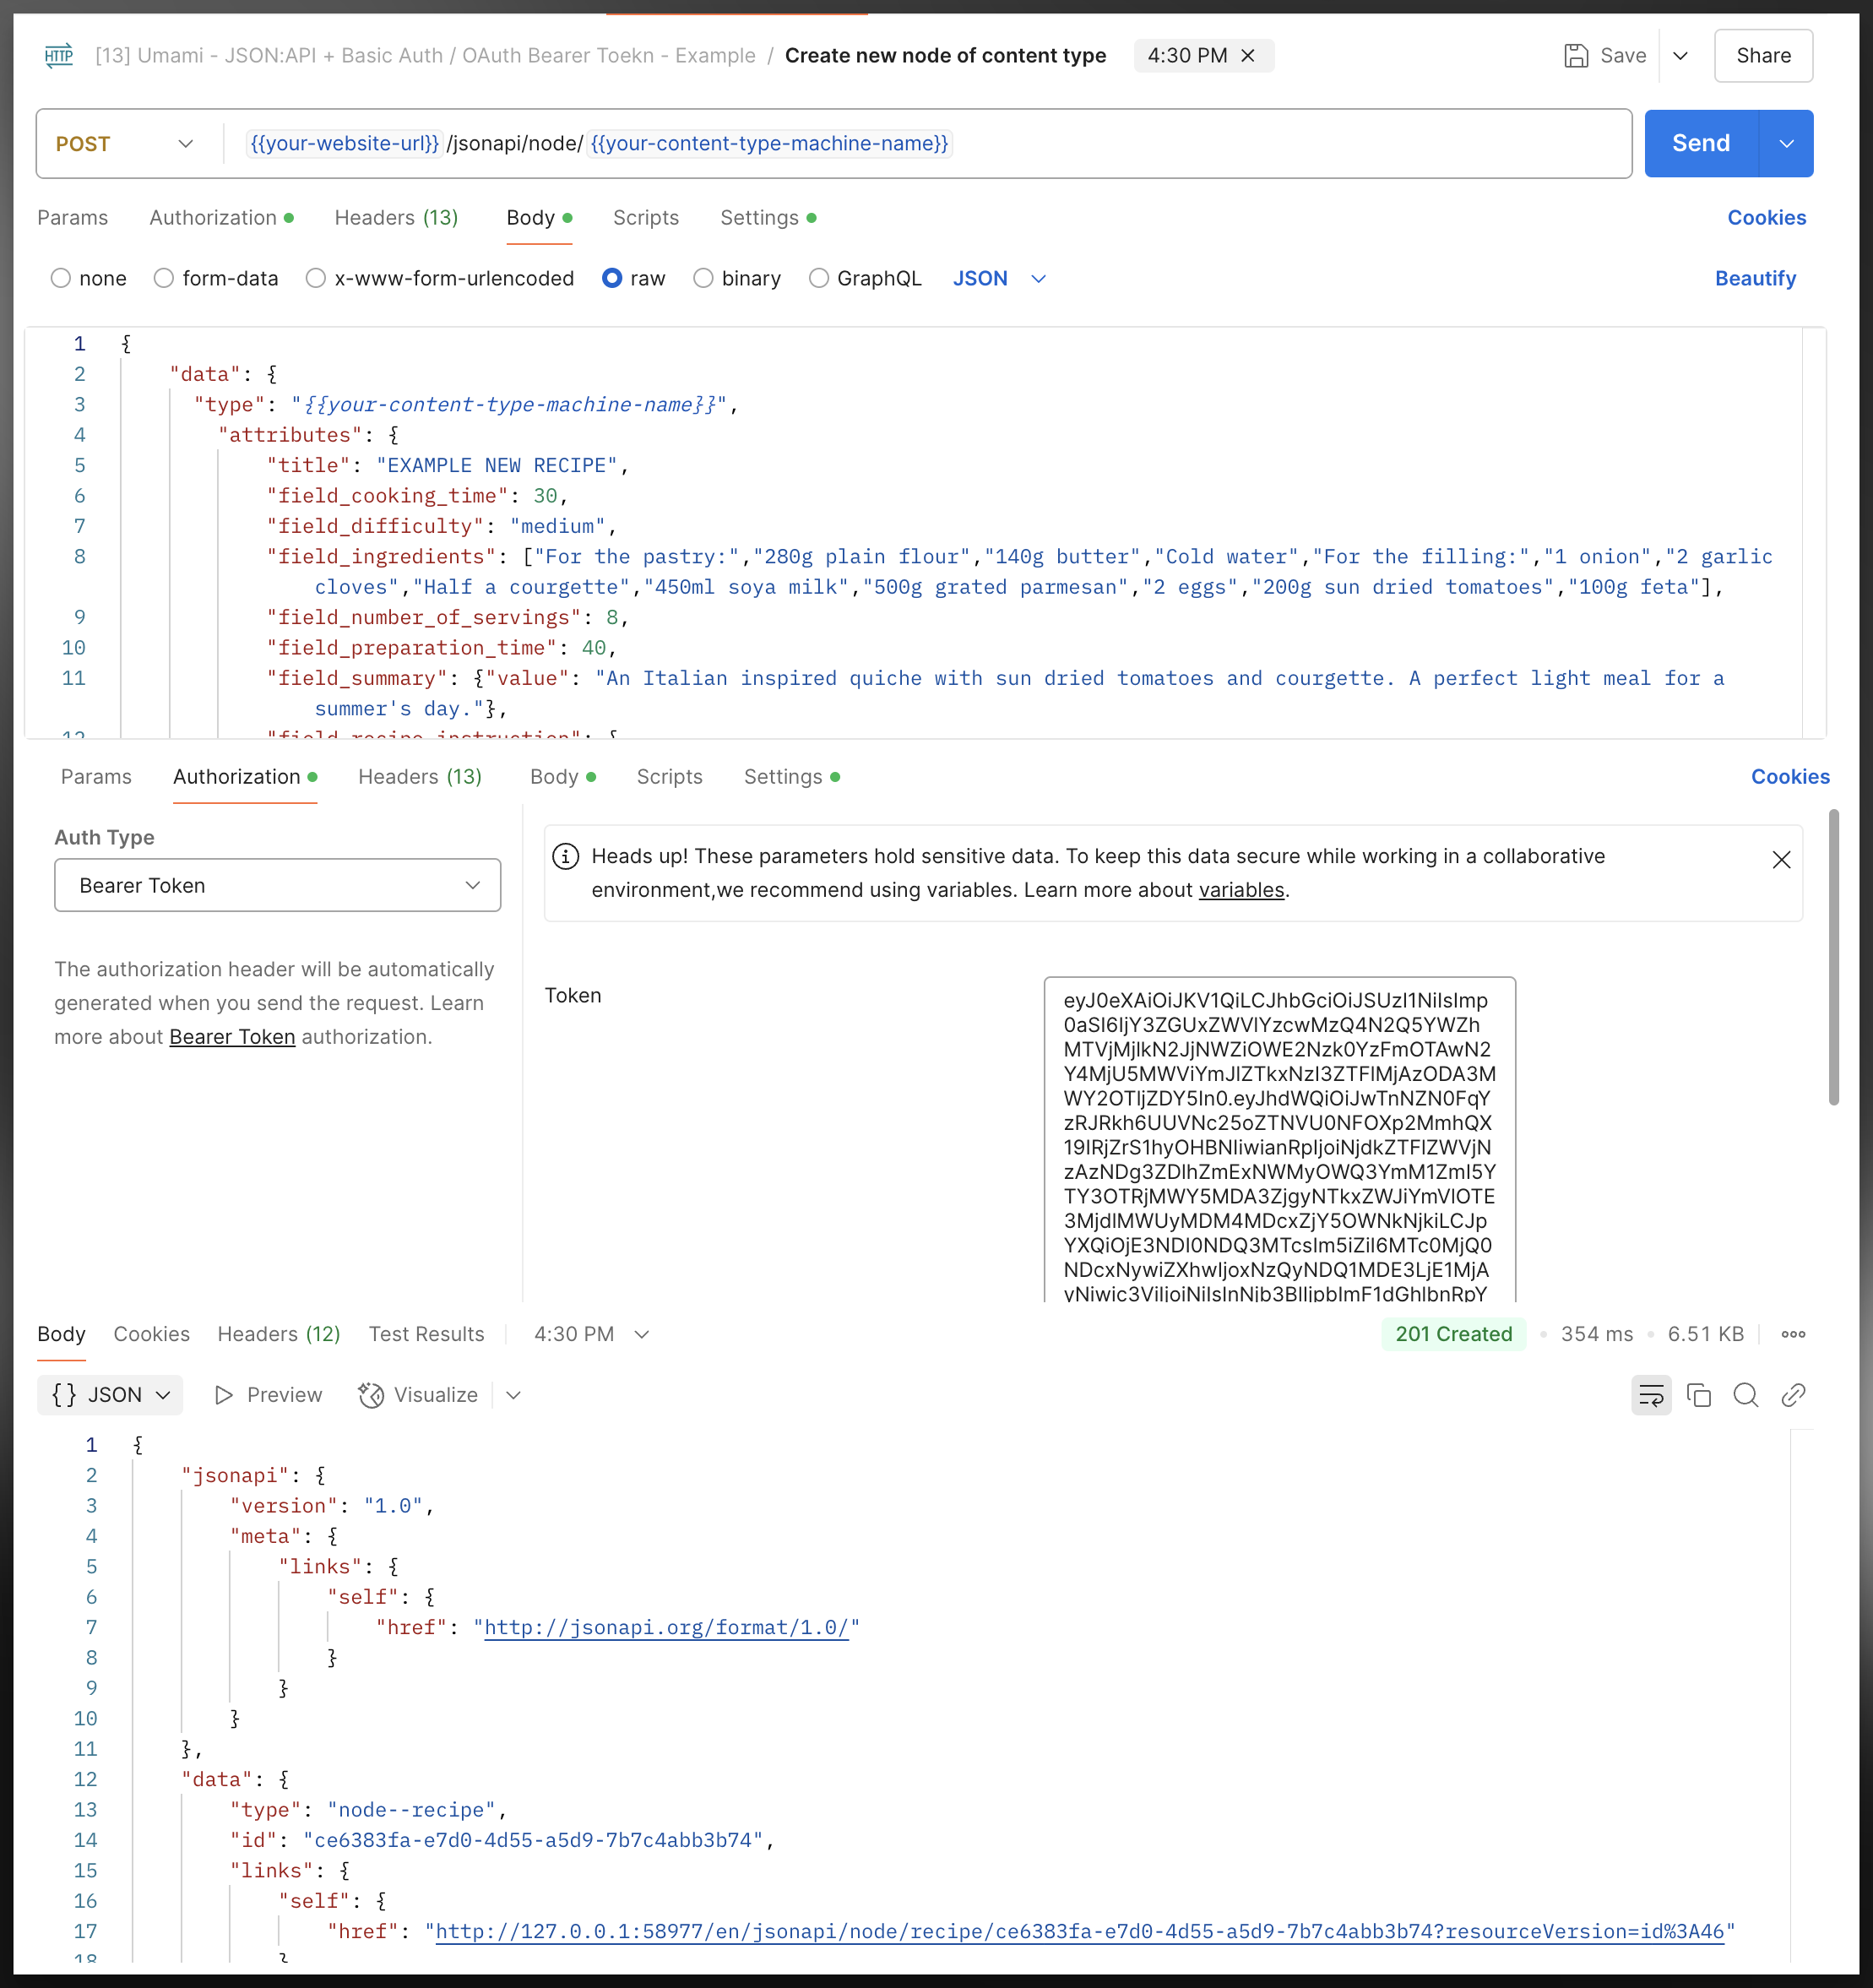
Then finally you can request using the bearer token, you will have the same permission as the user/role that’s configured for the consumer (that we just generated the token from), notice here that instead of using the “Auth-Type=Basic Auth” we are using Auth-Type=Bearer, as such we are no longer passing the username and password everytime we make a request, and the token will stop working whenever it expires:
| |
PostMan API Call - Export (v2.1)
For your convinience I have exported all the aforementioned endpoint/API called in postment and have it attached below:
[Umami - JSON-API + Basic Auth - OAuth Bearer Toekn - Example.postman_collection.json](Umami - JSON-API + Basic Auth - OAuth Bearer Toekn - Example.postman_collection.json)

By default, some calls use “Basic Auth” as their request authentication method. After setting up the Simple OAuth module as previously demonstrated, you can use the “Get Bearer Access Token” feature to obtain a bearer token. You can then replace the “Basic Auth” with “Bearer Token” authentication.
Reference
Some Documents & Videos that Helped me
Some Answers I got from Perplexity that’s helpful
Other Document / Modules that are Relevant