This post is mostly based on the live-stream session from WebWash: https://www.youtube.com/live/IYuQh1zRwz0. So, if you have the time to watch this genius’s video, definitely check it out instead - you will learn much more compared to reading this post.


If all you need is some customization using CSS and JS without modifying the actual Drupal theme, you may use the Asset Injector (asset_injector) module (see: https://www.drupal.org/project/asset_injector). Notice that at the very bottom of each injector, you get to select the condition where the injection would occur, for instance, when on a page of content type “Standard page”.

2025-06-06T124046

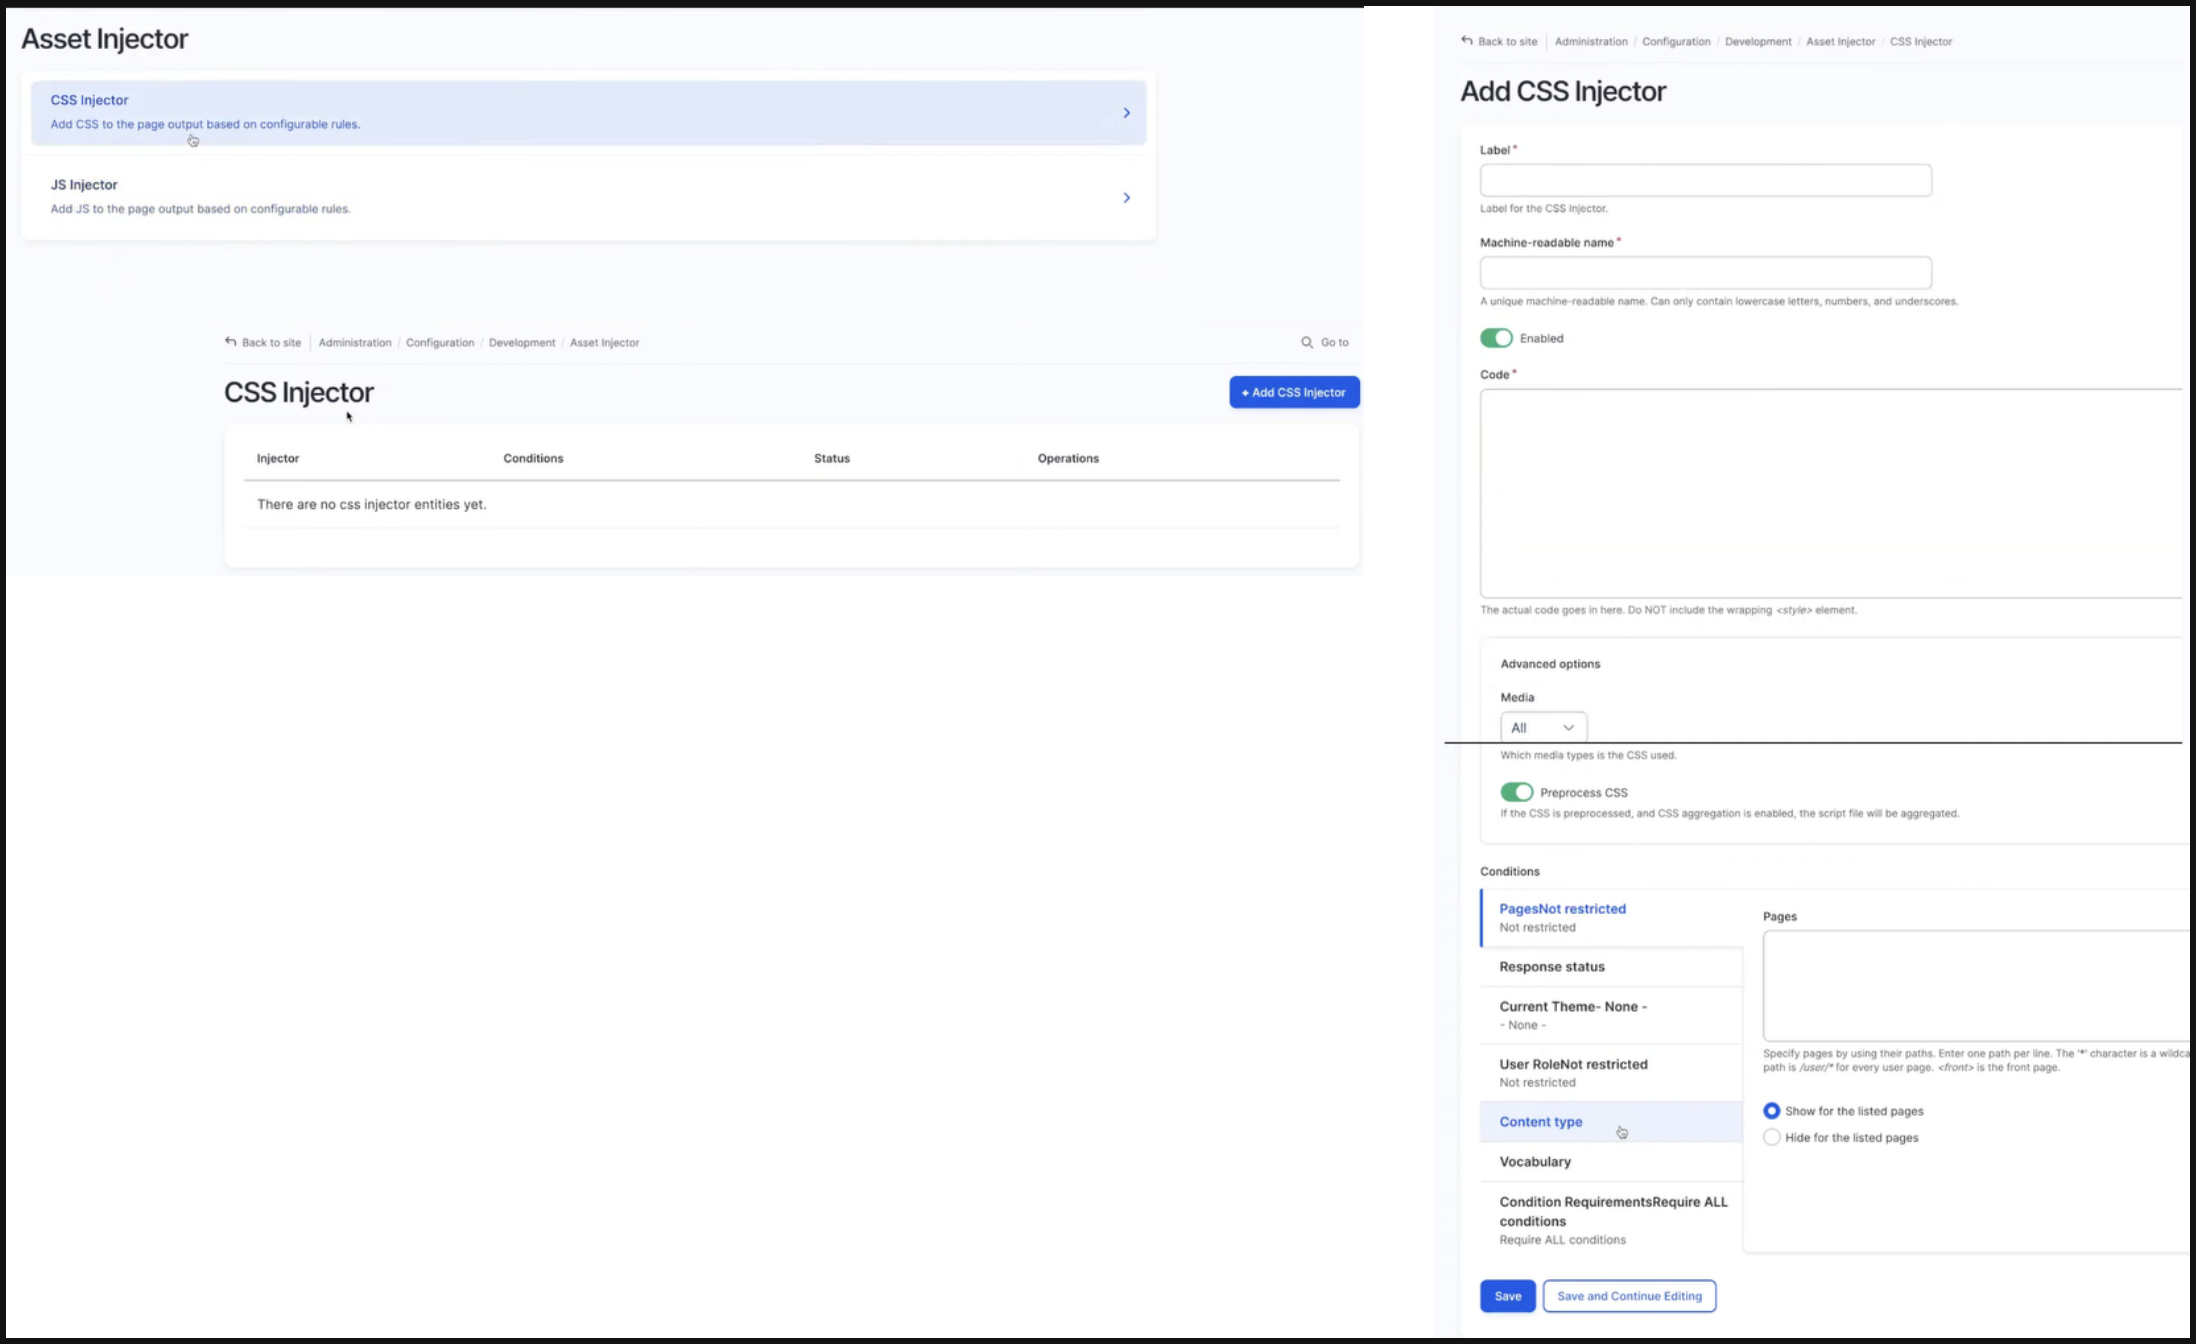
If you would turn off the CSS/JS Aggregator feature in developers settings, you will be able to find the CSS/JS is in fact getting saved as a file directly inside the asset_injector module, and being attached to the page:

2025-06-06T102009


2. Drupal Theme Library

You may declare CSS and JS assets via your Drupal theme’s theme_name.libraries.yml file. Below are a few examples from the bootstrap_barrio.libraries.yml for your reference:

 1
 2
 3
 4
 5
 6
 7
 8
 9
10
11
12
13
14
15
16
# Boostrap using [locally stored files] & [CDN (remote)]
bootstrap_local:
  js:
    /libraries/bootstrap/dist/js/bootstrap.min.js: {}
  css:
    component:
      /libraries/bootstrap/dist/css/bootstrap.min.css: {}
  dependencies:
    - core/popperjs
bootstrap_cdn:
  js:
    //cdnjs.cloudflare.com/ajax/libs/popper.js/1.14.3/umd/popper.min.js: {}
    //stackpath.bootstrapcdn.com/bootstrap/4.5.2/js/bootstrap.min.js: {}
  css:
    component:
      //stackpath.bootstrapcdn.com/bootstrap/4.5.2/css/bootstrap.min.css: {}
 1
 2
 3
 4
 5
 6
 7
 8
 9
10
11
12
13
14
15
16
17
# Fonts & Icons using [CDN (remote)]
font_google_roboto:
  version: VERSION
  css:
    component:
      fonts/roboto.css: {}
      //fonts.googleapis.com/css?family=Roboto|Roboto+Condensed:700: {}
icon_material_design:
  version: VERSION
  css:
    component:
      //fonts.googleapis.com/icon?family=Material+Icons: {}
icon_fontawesome:
  version: VERSION
  css:
    component:
      //use.fontawesome.com/releases/v5.13.0/css/all.css: {}

As a practical example, let’s say if you would like to use the slick slider in your project, you can include it in your sub-theme’s library via:

 1
 2
 3
 4
 5
 6
 7
 8
 9
10
11
12
13
14
15
16
17
18
19
20
21
# Files downloaded from: https://kenwheeler.github.io/slick/
slick:
  css:
    theme:
      node_modules/slick-carousel/slick/slick.css: {}
      node_modules/slick-carousel/slick/slick-theme.css: {}
  js:
    node_modules/slick-carousel/slick/slick.min.js: {external: true}
  dependencies:
    - core/jquery

# jsDeliv CDN (remoe) found on: https://kenwheeler.github.io/slick/
slick_cdn:
  css:
    theme:
      //cdn.jsdelivr.net/npm/slick-carousel@1.8.1/slick/slick.css: {type: external}
      https://cdn.jsdelivr.net/npm/slick-carousel@1.8.1/slick/slick-theme.css: {type: external}
  js:
    //cdn.jsdelivr.net/npm/slick-carousel@1.8.1/slick/slick.min.js: {type: external}
  dependencies:
    - core/jquery

(*"external:true" is used to denote that the script is from an external source, and Drupal will not process this script through its asset optimization system. This means the file will NOT be included in the minification, aggregation, or other preprocessing steps.)

1
2
3
4
5
6
7
8
9
# File where the logics to turn normal <div> into slider cards reside
slick_init:
  js:
    src/js/slick-init.js: {}
  dependencies:
    - core/jquery
    - core/once
    - core/drupal
    - radix_subtheme/slick

Note that once you have declared the library, it is NOT the end. In order to attach it to pages during rendering, you will either have to:

  1. Attach it as a global library of the sub-theme via the theme_name.info.yml file
  2. Attach it in the relevant Twig template via the {{attach_library('theme_name/slick-init')}} function
  3. Attach it in the preprocessing hook via the theme_name.theme file

2.a. Attach Library as Global Library

To attach a library to a theme globally, meaning it will get executed on any page using this theme, simply add it to the library attribute in the theme’s theme_name.info.yml after declaring the theme as previously instructed in the theme_name.libraries.yml file:

1
2
3
4
5
6
7
8
9
regions:
  navbar_branding: 'Navbar branding'
   footer: Footer
  ...
libraries:
  - theme_name/style
  - theme_name/global_js
+ - theme_name/slick_init
  ...

2.b. Attach Library via attach_library function in Twig Template

Adding CSS/JS assets globally may sometimes be overkill. For our example, the slick slider library will only need to be attached whenever a page has such a component, for instance, the front page. Having to load all libraries throughout the website might cause performance issues.

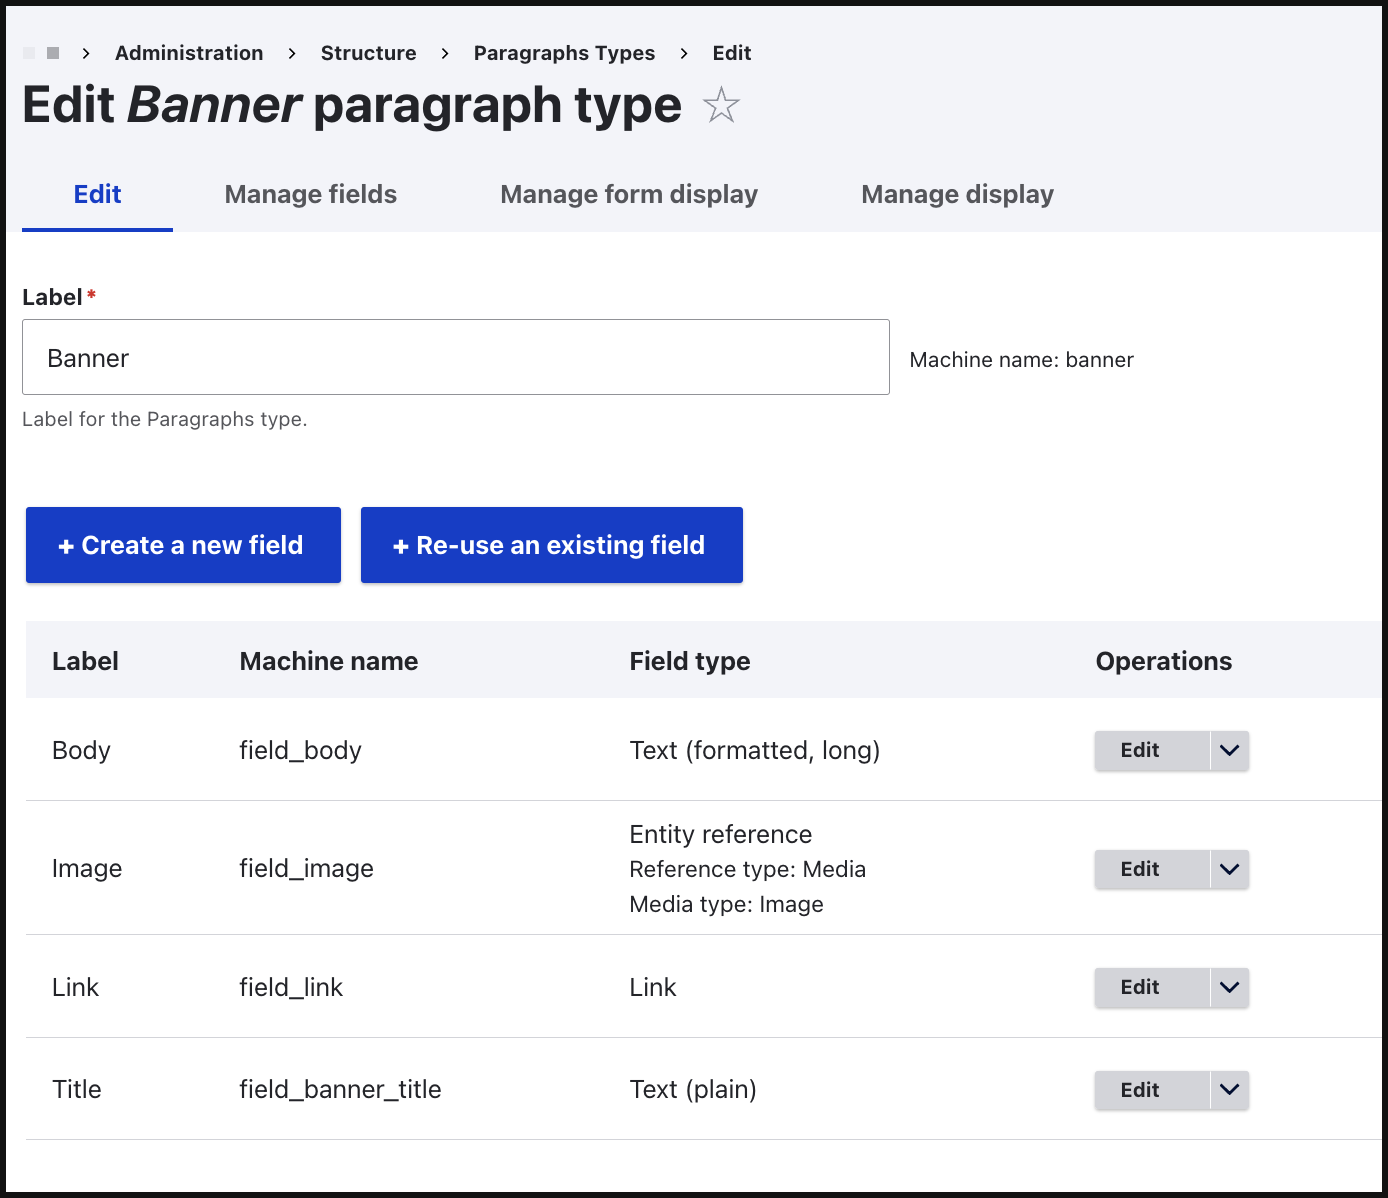
In order to create a slick slider, you might already have component created in drupal backend via paragraph (say “banner”), and is overriding its template via theme_name/template/paragraph/paragraph--banner.html.twig.

2025-06-06T105832

Then you may attach the library like the following:

1
2
3
4
{% block paragraph %}
   {# ... #}
{% endblock paragraph %}
+ {{attach_library('theme_name/slick-init')}}

This way the library is only getting attached to the page when this template gets rendered.

(Read more on: https://www.drupal.org/node/2456753)

2.c. Attach Library via preprocess Hook

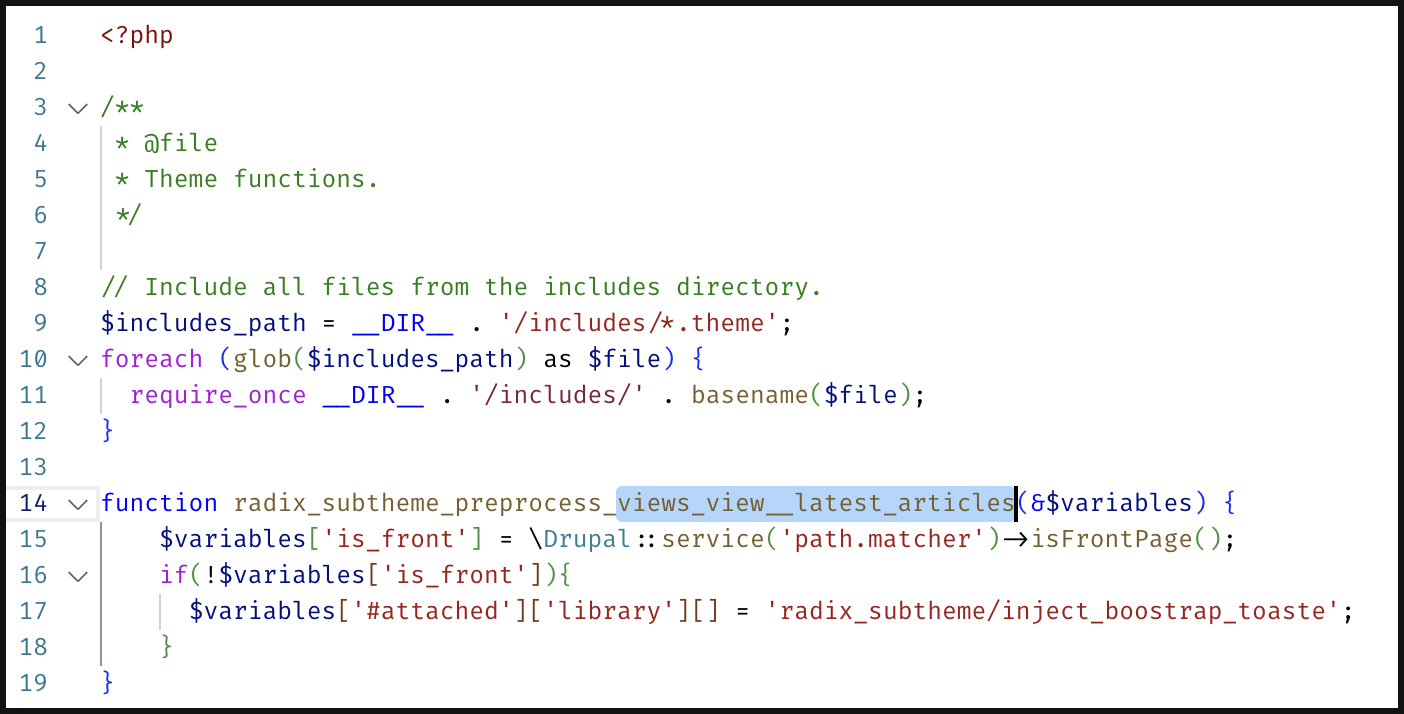
If you would like finer control over when the library gets attached, for instance, only attach a library whenever a page “is a front page” OR “has a title being Hello-World”, then adding a preprocess hook in the theme_name.theme file will be your go-to solution:

1
2
3
4
5
6
function theme_name_preprocess_hook(&$variables) {
    $variables['is_front'] = \Drupal::service('path.matcher')->isFrontPage();
    if(!$variables['is_front']){
      $variables['#attached']['library'][] = 'theme_name/slick_init';
    }
}

Below is an example:

2025-06-06T112319

2025-06-06T112258

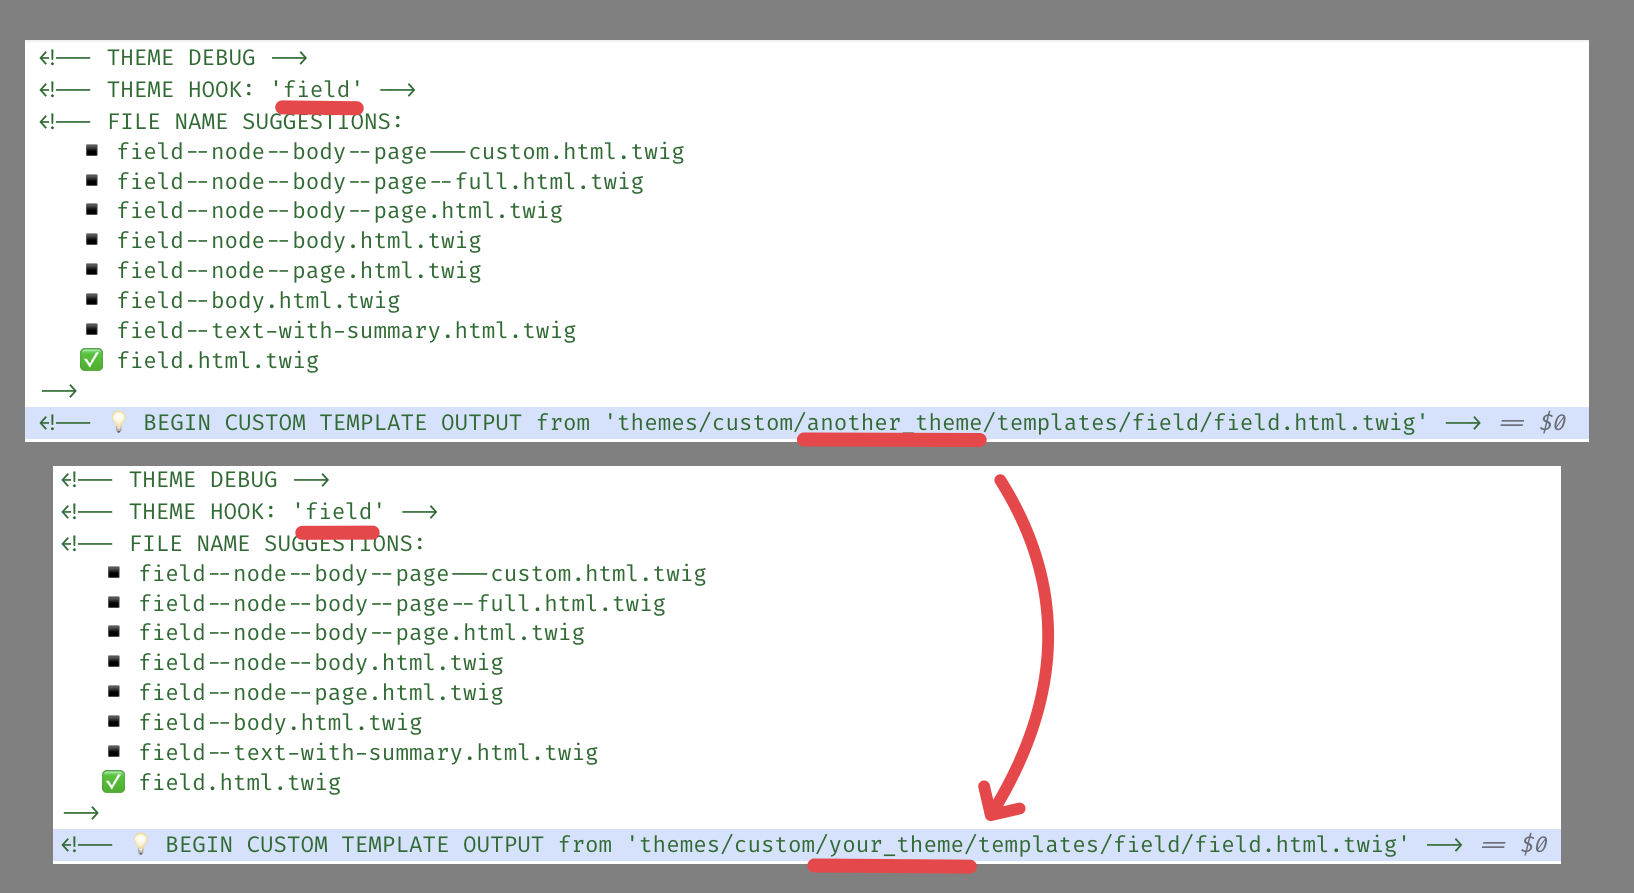
(* I also noticed that sometimes the preprocess hook will not get called when the relevant Twig template is not in your theme. Under this condition, copying the *.html.twig template from the original theme to your sub-theme will resolve it (and I don’t understand why yet…)

2025-06-06T111207

(With the preprocess hook, you can also do powerful things such as “add meta description and title” programmatically. See this post: https://www.drupal.org/docs/develop/theming-drupal/add-meta-description-and-title-programmatically for more details)


3. Library Override / Extend

If you wish to extend or override a part of the installed theme’s library (usually the base theme), you can do that via library-extend or library-override in your sub-theme’s theme_name.info.yml file.

If you wish to extend the popper library in your base theme’s library to add an additional JavaScript file for some extra interactivity, you may do that via the following:

 1
 2
 3
 4
 5
 6
 7
 8
 9
10
regions
	header: Header top
	....
library:
	- theme_name/global-styling
	- theme_name/slick_init
	...
+ libraries-extend:
+   boostrap_barrio/popper:
+   - theme_name/popper_extend       #(You will need to delcare this popper_extend library in your sub theme beforehand)

(see: https://youtu.be/IYuQh1zRwz0?t=4461)

Similarly, if you wish to override the typography in your base theme’s library, as well as to disable the component stylesheet for your form, you may do that via the following:

 1
 2
 3
 4
 5
 6
 7
 8
 9
10
11
12
13
regions
	header: Header top
	....
library:
	- theme_name/global-styling
	- theme_name/slick_init
	...
+ libraries-override:
+   oliverio/global-styling:
+      base:
+         css/base/typography.css: asset/css/base/my-theme-typography.css
+      component:
+         css/component/form.css: false

(see: https://youtu.be/IYuQh1zRwz0?t=4769)


4. Single Directory Component

You may declare an SDC by creating a folder in your theme’s component directory with the following files:

1
2
3
4
5
6
7
custom/theme_name
   component/
      component_name/
         component_name.component.yml
         component_name.css
         component_name.twig
         component_name.js

(* More details regarding the setup of SDC can be found in one of my previous posts titled: “Single Directory Component with Drupal”, as well as the official guide: https://www.drupal.org/docs/develop/theming-drupal/using-single-directory-components/quickstart)

Once set up, you will be able to use it using the {{include}} or {{embed}} keyword in your Twig template, for instance:

 1
 2
 3
 4
 5
 6
 7
 8
 9
10
11
12
13
14
15
16
17
18
19
20
21
22
23
24
25
26
27
28
29
{# A carousel component using radix's built-in SDCs #}
{# block--block-content--type--carousel.html.twig   #}

{% set block_id = content['#block_content'].id() %}
{% set block_items = [] %}

{% for item in content.field_carousel["#items"]  %}
    {% set block_items = block_items|merge([
        {
            caption_title:   item.entity.field_title.value,
            media:           drupal_entity('media',item.entity.field_image.0.entity.id, 'large'),
            caption_content: item.entity.field_caption.value,
        }
    ]) %}
{% endfor %}

{% embed 'radix:block' with {id: content['#block_content']['id']}%}
    {% block block_content %}
        {%
        include 'radix_subtheme:carousel' with {
            show_carousel_control: false,
            show_carousel_indicators: false,
            id: 'carousel-['~block_id~']',
            items: block_items
        }
        %}
        {{content|without('field_carousel')}}
    {% endblock %}
{% endembed %}
 1
 2
 3
 4
 5
 6
 7
 8
 9
10
11
12
13
14
15
16
17
18
19
20
21
22
23
24
25
26
27
28
29
30
31
32
33
34
{# A accordion component using radix's built-in SDCs #}
{# block--block-content--type--accordion.html.twig   #}

{% embed 'radix:block' %}
    {% block block_content %}
        {% set accordion_items = [] %}
        {% for item in content.field_accordion['#items'] %}
            {% set accordion_items = accordion_items|merge([
                {
                    title: item.entity.field_title.value,
                    content: {
                        '#type': 'processed_text',
                        '#text': item.entity.field_body.value,
                        '#format': 'full_html',
                    },
                    title_tag: 'h3',
                    stay_open: false,
                }
            ]) %}
        {% endfor %}

        {% include "radix_subtheme:accordion" with {
                title: item.entity.field_title.value,
                content: item.entity.field_body,
                id: 'accordion-[' ~ content['#block_content'].id() ~ ']',
                title_tag: 'h3',
                open_item_id: 1,
                flush: false,
                items: accordion_items
        } %}

        {{ content|without('field_accordion') }}
    {% endblock %}
{% endembed %}

Credit / Reference